WELL-PRICED TOOL FOR A FLUID SCREENCASTING WORKFLOW
Every once in a while we get a game changer, something that comes along that makes us rethink what we thought a certain category of products can do. ScreenFlow, for me, is that type of product.
I’ve been creating tutorial content using screen capture software for a number of years. This has included everything from 15 to 20 minute quick-tip videos to hours of training on a particular application. Once recorded, I either have to do all of the post-production on the resulting QuickTime movies myself (using Final Cut Pro and Motion), or hand them over to a company to produce the final product. Except for rather simple demos, there’s usually a fair amount of post needed, especially when you want those nice pans and pushes to polish it all off (think Ken Burns).
ScreenFlow takes a different approach. Its features work together to produce a stand-alone screencasting application.
Here’s how it works.
Recording
In ScreenFlow, the recording dialog box lets you choose what desktop you will record from (if you have multiple monitors), where your external video will be recorded from (iSight, DV camera, etc.), where you will record audio from (built-in mic, external mic, camera mic, etc.), and whether or not you will record your computer’s audio.
You can also mix and match. Let’s say you want to use your DV camera to record video, but a USB mic to record your audio. You can do that. I recorded video using a DVX100A and hooked up a boom to the camera. The resulting video was much better quality than my iSight could produce and the audio quality was very good.
Being able to record video, along with your screen recording, opens up so many possibilities. With a little planning, you can create a simple set and incorporate "live" video training as part of your screencast. You could, for example, do training on tapeless workflow and show the camera and how to use the software once the footage has been transferred to your system.
Editing
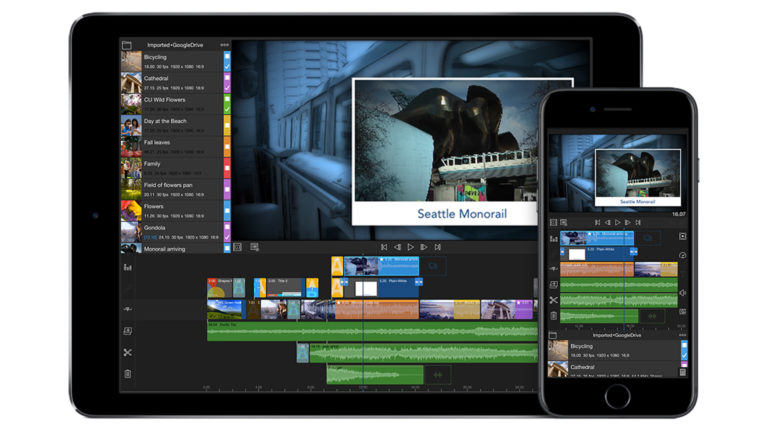
ScreenFlow’s built-in editor is the real game changer. As soon as you stop recording, a new document is created and you are dumped into ScreenFlow’s Main Window. This is broken up into three areas. The first is the Timeline where you edit your overall video (trimming clips and actions, adding markers, splitting tracks and setting in and out points). The second is the Preview area, which dynamically shows you your final, edited piece. The third is the Properties area, where you can access and add media to your project, change the properties of your movie’s clips and add actions to your tracks.

This window is composed of three sections: the editing timeline, the preview area and the properties area.

Add motion blur to your final movie to give the animated elements a much more polished look (bear in mind, however, that it will take much longer to render).

I recorded video using a DVX100A and hooked up a boom to the camera. The resulting video was much better quality than my iSight could produce and the audio quality was very good.
Along with the Timeline, the Properties area lets you modify your entire movie after it has been recorded. It also allows you to add video, audio and callout actions. These actions let you zoom, pan & rotate, add reflections & drop shadows, adjust audio levels and focus on a certain areas of your desktop recordings, all over time. It takes a little while getting used to ScreenFlow’s actions, but a couple of trips to the help file will get you up to speed in no time.
Use a USB microphone with your computer or a boom or lavalier mic through your DV camera. This will result in much better audio in your screencasts.
The Properties area also has another killer feature: Screen Recording Properties. These can be used to affect your mouse pointer in your movies and also show, as overlays, the keyboard keys and modifier keys that you pressed when recording. As with the video, audio and callouts, these properties can be added as actions (so they change over time).
One more terrific feature you get access to when editing is the ability to add an additional recording (desktop, audio and/or video) to your existing project. This handy feature lets you build your screencasts into full-blown videos.
Exporting
Once you’ve edited your ScreenFlow masterpiece, it’s time to export. ScreenFlow has a number of presets that include iPod, iPhone and Apple TV. There are also presets for Web delivery. You can also customize a QuickTime-based preset to use your codec of choice and tweak your compression, size and sound settings.
Aside from the export presets, you can change the dimensions of your movie in the Export dialog. There’s even an option to include chapter markers, created in the ScreenFlow’s editor, as part of your final movie.
Still a Few Things Missing
ScreenFlow is really solid. That said, when someone creates a product that shows the potential in a specific area, we get greedy. As much as I am really digging this application, there are a few things I’d love to see. See the "What’s Missing" section of this review to find out what my wishlist includes.
While I will continue to use other screen recording solutions for certain projects, I can see ScreenFlow being used for the majority of the computer-based training I do in the foreseeable future.