Realtime color-grading performance from software is amazing for the price, but hardware to get you there costs extra
Fast-forward to 2011. Resolve for the Mac is shipping. There’s even been a couple of maintenance updates that have added bug fixes and new functionality. So for $1,000 you can own what is a similar software tool to the color-grading systems used to grade features like Avatar, Terminator Salvation and the recent Robin Hood. But know that you’ll also need, in the very least, an NVIDIA graphics card, such as the latest Quadro 4000 for Mac, roughly another $1,000, or an older Quadro FX 4800, which sells for a bit more. That will get you realtime grading playback on your computer monitor, provided the rest of your Mac Pro is up to spec; check the Mac Configuration Guide for details. A proper Resolve for the Mac grading system is going to need more hardware.
Add in a $1,500 Tangent Wave control surface, another $1,000 for a Blackmagic Design DeckLink HD Extreme 3 capture card and some type of grading monitor (a $2,695 Flanders Scientific LM-1770W anyone?) and you’ve spent quite a bit more than $995. Plus, there are other potential expenditures like a RED Rocket card and a number of options for a fast RAID hard drive, if you haven’t gone with the internal Mac Pro option. Oh, and you can also get a $1,694 Cubix expansion chassis when you run out of PCI slots.
But even with these costs well above and beyond $995, you’re still able to set up a very powerful color-grading system at a fraction of what it would have cost in the past. And you’ll get performance that leaves Apple Color in its wake. All these extra requirements might come as a bit of a shock to the Apple Color-only user/editor/colorist more accustomed to Color support from mostly the same hardware that supports Final Cut Pro. I’m not a dedicated colorist but rather an editor who does sometimes have to do color correction in his work. This is usually accomplished with Magic Bullet Colorista, from within Final Cut Pro for some jobs, or a move to Apple Color for others. Since the Apple Color market is one of Resolve for the Mac’s primary targets, this review will focus on Resolve for the Mac from a Color user’s point of view.
Getting an Edit into Resolve
There are three points of operation where this review will focus: input, operation and output. That’s getting an edit into Resolve, grading within the application and getting media back out.

The Resolve Media Pool is where media is loaded into Resolve for
conform and grading (click on image for larger view).
Getting an edit into Resolve for the Mac isn’t quite as simple as a Send to Color operation from within Final Cut Pro (not that that’s simple, either, if you’ve got mixed formats and frame rates). For the most part, Color and FCP’s integration is pretty simple if you’ve properly prepped your sequence. Send a sequence to Color, do your grading and then send that back to FCP. Resolve, on the other hand, is dependent on an edit list of some sort as part of the process of conforming your edit for grading. Lists can mean an EDL or AAF. Conforming means you have to be mindful of where your media is stored, as that media has to be loaded into Resolve’s Media Pool (above) before it can be conformed. And since it’s conforming from a list, it needs to have proper metadata in the form of timecode and reel numbers to make that conform a seamless process. This requires some prep work on the front of your edit and a knowledge of what formats are being shot, as well as what those limitations might mean for a Resolve conform. HDSLR media might need some work.
On the one hand it would appear Color has the upper hand with it’s ease of use with FCP’s Send to Color command. In reality Resolve is a much more flexible tool when it comes to conforming and importing of media. Besides basic ProRes support Resolve can read native Avid DNxHD MXF media with the $500 purchase of Avid File Support (as of the Resolve 7.1 update, this feature no longer requires a Final Cut Pro install). It’s a shame that this is an additional cost but from what I’ve been told you can point the finger more at Avid than Blackmagic Design (the cost covers Avid’s licensing fee for the DNx codecs).
Besides conforming an edit, Resolve also features a very useful Automatic Scene Detection module that can take a self-contained QuickTime and slice the file up into individual shots for grading. This is made even easier and more accurate with an accompanying EDL. It also means you can get most any edit into Resolve.
For the input of media and preparation for a grading session, Resolve can take quite a bit more time and effort than Color. But the overall breadth of support that Resolve can offer beats Color, hands down, for the shop that wants to offer grading services for more than just Apple ProRes projects from Final Cut Pro. Color can do more than ProRes, as well, but let’s face it: after Apple’s acquisition of the product that was to become Color and its integration into Final Cut Studio, it feels mostly like an FCP support application.
Grading Comparisons
When it comes to actual grading, both Color and Resolve offer very similar options. Primaries and secondaries accomplish most of the tasks. Secondaries include keys and mattes as well as resizes and a tracker. But the way the user goes about implementing these options are very different.
An Apple Color session is divided into different rooms including Primary In, Secondaries, Color Fx and Primary Out. The place where you can begin "stacking" grades for more complex image manipulation would be in the Secondaries room or the Color FX room. Resolve has just one main "room" where creative grading is done: the COLOR tab (more on all the Resolve tabs in a bit). But it uses nodes for nearly infinite possibilities when it comes to grading. Nodes are similar in concept to what you’ll find in a node-based compositor like Shake or Nuke. You add different types of nodes to a shot in Resolve and then combine and connect them in different ways to create some advanced grades, if need be.
When grading in Resolve, each shot begins with a single node that reflects any correction you make. Additional nodes can be thought of like layers. Add a new node for each new correction you want to make. A secondary key would be a new node. A circular Power Window would be a new node as well. Each node has an input and output so the output of the previous node connects to the input of the next node, depending on the type of node, and continues on until the final node connects to the output in Resolve’s node graph.
In addition to the input and output "hooks" (as the Resolve manual calls them), which are represented by yellow dots on each node, there are key/matte input and output hooks which are yellow triangles. This means you can use externally generated mattes as well.
There are different types of node structures including Serial nodes that cascade down the chain, one after another, and Parallel nodes that can place new nodes in parallel with each other. Parallel nodes can be especially handy when combining multiple keys and shapes on a single shot to achieve a complex correction.

The Resolve node graph with two of Resolve’s built-in software
scopes (click on image for larger view).
The node graph is an important part of the Resolve COLOR tab; this is where users will spend a lot of creative time. A colorist will become quite familiar with the little thumbnails and connecting lines of the node graph as they learn Resolve. It really is an interesting way of working; each node has a thumbnail image that updates with each correction. This makes it easier to see how complex corrections are made. Stills can be stored for shot comparison as well as for recalling the node structure to use in the grade again.
Again, all of this node work and the main task of grading itself takes place in the COLOR tab. Resolve does look like it has rooms similar to Apple Color, which are listed via buttons across the bottom of the interface. But they are actually dedicated to overall session tasks as opposed to individual color correction tasks, which are all handled with nodes.
These tabs include a CONFIG page for project setup and project management; BROWSE for locating and reviewing files and loading the clips into the Media Pool for conforming; CONFORM for importing EDLs and AAFs, conforming the edit and comparing an offline reference; COLOR for doing the actual grading work; VIEWER for a full screen viewer of the image, as well as tracking tasks; GALLERY for managing stills and saved corrections; FORMAT for pan, tilt and zooming type reformatting; DECK for ingest and record to tape; REVIVAL for dust and grain cleanup and SCENE for scene cut detection of self-contained movie files.

A six shot Resolve timeline (click on image for larger view).
As I mentioned, most of your time will be spent in the COLOR area. Resolve doesn’t really have a timeline in the same sense that Color does. It’s more like a filmstrip (above) that runs along the interface with a different thumbnail per shot. There is a small timeline above the thumbnails that shows a visual representation of the edit, which can be zoomed around for easy navigation. There’s a viewer window for seeing the image and tabs for storing stills.
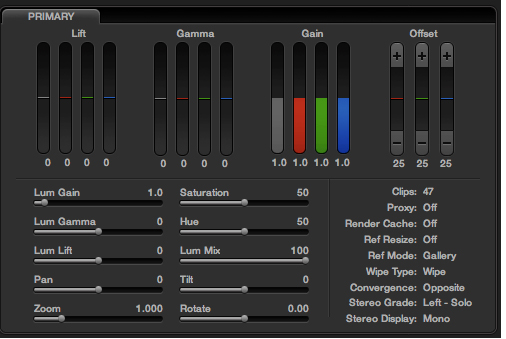
The Resolve primary tab (click on image for larger view).
At the bottom of the COLOR tab there’s a Primary tab, above, that includes Lift/Gamma/Gain controls and resize options. Resolve doesn’t include graphical color wheels for color balance adjustments like those in Color, so without a control surface, you’ll be doing a lot of mousing work. It’s an interface that is really designed for a grading surface. The Tangent Wave and JLCooper Eclipse CX are the only supported surfaces at this writing, other than the $30,000 DaVinci panel.
Also at the bottom of the COLOR window are all the tabs for curve adjustments, keys, Power Windows and blurs. Another timeline exists for the keyframing (or "Dynamics," as Resolve calls them) of windows and corrections. This bottom-third area of the COLOR tab is, in essence, the cockpit for an awful lot of work in Resolve. It’s nice just to stay put. Compare that to the Rooms of Apple Color, where it feels more like you’re jumping all around, and you’ll see how refreshing grading in Resolve can be.
One thing you’ll notice right away is that Resolve is very dependent on the right mouse click. A right + click often reveals a ton of options within the CONFORM tab or the COLOR tab. The functions within Resolve run deep and it will take a lot of time to learn them all.

An image thumbnail in the Resolve timeline. The submenu is
accessed via a right + click on the timeline thumbnail.
The thumbnail timeline of the COLOR tab, for example, has a number of stored options. A right + click on a shot will reveal functions like adding versions of a grade, grouping and viewing a clip’s details. The colorist will also have to get to know what all of the icons and symbols mean that appear on the shot thumbnails as a session progresses. The interface of the COLOR tab becomes a bit cluttered to my eye, but there’s a lot of information that’s being tracked and displayed.
An Amazing Motion Tracker
One real standout tool that many Resolve users are talking about is the motion tracker. The Resolve tracker tracks objects, as opposed to points, within the frame. If you’ve drawn a matte around an object, it’s as easy as telling the tracker to track forward. You’ll see a swarm of tracking marks go to work analyzing the object underneath and moving the matte with it. It’s very fast and accurate. Color’s point tracker feels primitive in comparison.
The output stage of a Resolve session will probably mean file generation for most. There are tools within Resolve for both input and output to tape but chances are most Color users are generating files when a grading session is complete. The Resolve Render window is where you set parameters for file-based output. You can render a single file to most all common formats, including DPX, TIFF and QuickTime, as well as Avid DNxHD MXF files if you have the Avid File Support installed. You can also render those formats to individual files using source timecode so they can be relinked/reconnected in an editing application for final finishing. That option makes Resolve especially useful in real, multiroom post-production pipelines, rather than in a one person/one machine operation. Rendering of output files is very, very fast.
Some Drawbacks
It’s not all roses with Resolve for the Mac, though. One huge limitation is support only for a single layer of video. This means things like picture-in-picture effects will have to be handled to rendered clips with windows, or complex opacity blending might mean the shots will need to be graded separately and rebuilt after the fact. This is how things worked with Resolve’s predecessor, the tape-based DaVinci 2K. In this nonlinear editing world we live in today, however, the single video layer feels like an idea from an old era. It will feel like a limitation to the Apple Color user who’s used to sending multiple video tracks over to Color from FCP or entire timelines back to an editor for final revisions and graphics.
Resolve doesn’t support Final Cut Pro’s XML format but it does support Avid’s AAF format. That seems silly and my guess is engineers are adding XML support as you read this.
There’s also no support for Photoshop-style blending modes (which I guess, without a multilayer timeline, is a moot point) and things that I’ve seen dedicated colorists point out is missing in Resolve, like hue curves or a more advanced keyer.
For video hardware you’re going to need a Blackmagic DeckLink HD Extreme 3 card as well. AJA and Matrox need not apply, as Resolve is a Blackmagic product. The powers that be at BMD have signaled their intention to support other manufacturers I/O hardware at some point in the future. As of this writing, it’s DeckLink only.
Control Surface Options and GPU Support
Now back to that control surface. You’re going to need one to do serious grading with Resolve for the Mac, so at the very least, you’ll be adding $1,500 to the price for a Tangent Wave. The newly supported JL Cooper Eclipse CX lists for just under $7,000. You can limp around with the mouse/tablet/trackball and get some work done, but serious grading needs a surface. Besides, many colorists prefer to work this way.
No discussion of Resolve for the Mac is complete without talking about it’s GPU support of NVIDIA’s CUDA architecture, as that’s the remaining piece of Resolve’s power. Running Resolve with supported NVIDIA graphics cards is essential for realtime playback. How much realtime you get will be dependent on several factors, including which NVIDIA card you’re running, how many nodes are being played back per shot, as well as CPU issues like speed of the Mac and the speed of the media drives. I tested Resolve on two different Macs with two different NVIDIA cards (the Quadro FX 4800 for Mac and the new Quadro 4000 for Mac) and I was easily able to achieve realtime playback on ProRes HQ and DNxHD 175 with around 4 – 8 nodes. Blackmagic Design recommends two video cards in a system, one less powerful card for running the interface (where the monitor is connected) and the more powerful card for the processing. You can run Resolve on a Mac with configurations that don’t meet the Mac Configuration Guide (as I did on one of my test systems), but for best performance, follow the guide. This kind of realtime performance will be a real blessing to the Color-only user who’s never seen ultrasmooth realtime playback out of Color.
One very nice thing that Blackmagic is doing is being quite aggressive with regular updates of Resolve for the Mac. The 7.1 update announced support for multiple GPU cards via an expansion chassis. That will put even more power into the hands of colorists for an even lower cost. Check that configuration guide for several helpful diagrams, including one running three NVIDIA Quadro 4000 cards at the same time. If Blackmagic’s early updating of Resolve for the Mac is any indication of its commitment to the platform, that’s another Resolve advantage over Color right there.
And speaking of that realtime playback: there have been reports coming across the ‘net that some colorists with dual GPUs running in the supported Cubix expansion chassis are seeing full frame rates with over 20 nodes.
A Powerful Choice
To sum up this admittedly lengthy review of DaVinci Resolve for the Mac, it’s all about power. When compared to Apple Color, Resolve’s power comes at an expense: the expense of buying the proper hardware to get optimal realtime performance out of Resolve and the expense of a necessary control surface (sorry, there are no iPad apps out yet for control). And then there’s the ultimate expense: the time to learn and use Resolve to its full potential. I think it’s safe to say there are a lot of Color users out there who will not be able to afford the full monetary cost of installing Resolve for the Mac.
But besides the dollars and cents cost, there will be a lot of Color users who won’t want to take the time to learn how to use Resolve properly. If you’re just thumbing through the menus of both applications, it doesn’t look like Resolve is that much more complex than Apple Color. But once you begin to dig into the manual you will see that it is. And once you begin to right + click within the Resolve interface you’ll realize the depth of what this application can do. There’s way more functionality in Resolve than what can be covered in a simple review. It’s not without its flaws, but no software is perfect. If I was setting up a dedicated grading suite, it would be an easy decision to install Resolve for the Mac over Apple Color. But the plus side is that today you really can have both.
And if the Apple Color user does decide that Resolve for the Mac is too expensive to setup or too complex to use? That’s fine. Color is still a very capable application that can do good work in the right hands. And it’s included right there in your Final Cut Studio box, still an amazing value on its own. Considering how much DaVinci Resolve used to cost before it came to the Mac—and considering how much other dedicated grading systems like Baselight, Film Master or the current Linux version of Resolve cost, plus the performance possibilities multiple GPUs will bring you—then DaVinci Resolve for the Mac might be the post-production steal of the century.


Leave a Reply