
A Top-Notch Sync Tool Gets Even Better with a New Music Video Workflow
If you follow post-production news at all, then you’re probably aware of (and may have even tried out) Red Giant's PluralEyes 3. Automatically syncing multiple cameras and audio tracks, it might be one of the single most useful technologies to ever come along in post-production. The product saw a big upgrade with version 3. And even version 3 has now seen a few updates (the program is now at v3.1.1) that added some great functionality.
If you don’t know anything about PluralEyes 3, you should first know that it differs greatly from previous versions. Where early versions were just a small import/export window (all setup was done in the non-linear editor), PluralEyes 3 is a one-stop-shop for all syncing. You don’t even have to open your favorite NLE before going to work syncing camera angles. Think of syncing as an entirely separate step in the post-production process. And think of PluralEyes 3 as the perfect tool for that step.
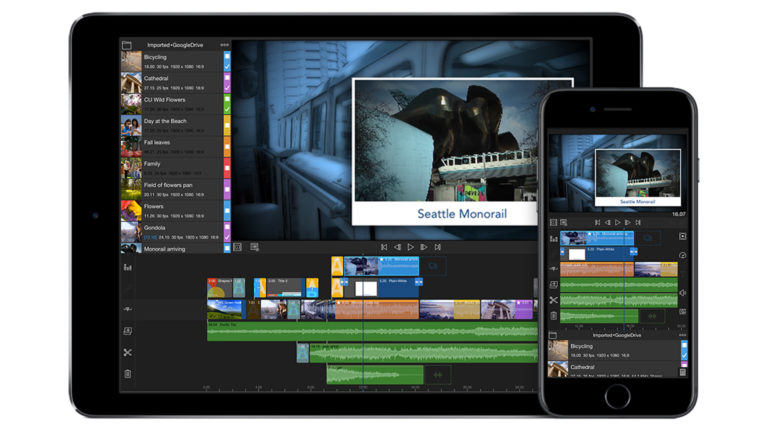
The most noticeable feature in the new PluralEyes 3 interface is definitely the large timeline window. It’s not a place to do any editing but rather a place to visualize all your camera angles and audio tracks. When angles are added for syncing, their waveforms are drawn in the timeline area. When the Synchronize button is pressed, you see the program go to work as the waveforms begin to slide around in the timeline and little arrows pop up and go away to show exactly where PluralEyes 3 is working at any given point. It’s fascinating to watch and I wouldn’t have thought it was really necessary for the editor to see exactly what is happening, as I’ve run many a sync operation through the old PluralEyes and never been able to watch it sync. But now that I can watch and keep tabs on what is happening, I feel much more connected to the syncing process and know exactly what to expect as it occurs.

When syncing is complete the new timeline is then basically a sync map that shows exactly what you’re going to have to work with when you move back to the NLE, provided you don’t want a multicam-type grouped clip (but why would you not want that?). Besides just seeing all the angles after syncing, the display of the waveforms is instant feedback on how successful the syncing operation was. But PluralEyes 3 is nice enough to provide some colors to help with that as well. If you’re syncing something like a music video that has exactly the same audio levels on each clip there’s a strange satisfaction to seeing all the waveforms in sync.

The process isn’t even complete and I can already see that Take 3 might be giving me problems. It looks like someone forgot to turn the camera off.
Besides just the waveforms being an indicator of sync, PluralEyes 3 also color-codes the clips after a sync operation has completed. Green means PluralEyes 3 sees success in syncing and red means it was unable to successfully sync a clip. Red clips in the timeline were unsuccessful and unsynced, and red indicators in the Media Bin mean the same thing. If you’re working with a lot of angles, then the un-synced count in the project tab will be especially helpful.

Red means unsynced. The number is the count of unsynced clips.
With the new interface comes a new ability to actually check and slip the sync before exporting back to the NLE. In addition to the timeline, a new viewing window allows for playback of footage.
You can choose which video angle to audition against which audio angle. This is very helpful when you’ve got a single master clip of audio. Just turn on the master audio and click through playback of the video tracks. You can also play all the audio tracks at the same time to make sure that all angles are in sync. While PluralEyes 3 syncs accurately, I still prefer to visually check at least a few angles before committing sync to the NLE.
If something is off, just slide the angle right in the timeline. You can click and drag a clip to move sync, but PluralEyes 3 also provides keyboard shortcuts for moving a clip.

I prefer a keystroke to nudge clips when I’m trying to judge and align sync and PluralEyes 3 provides those.
As great as PluralEyes 3, is there is a bit of tediousness involved in the original setup when you begin a project. Each camera angle or audio track must go into its own specific type of bin.

The different bins are important to note as you add one clip at a time while setting up a PluralEyes 3 syncing operation.
You have to add each angle one at a time via an Add Media Files import, or by dragging clips into the interface. You have to add a bin for each angle, and while this can be done via a keyboard shortcut it would be nice to add multiple bins at once. You most likely know exactly how many angles you have, so it would make more sense to tell PluralEyes 3 to just create that exact number of bins. Better than that would be to have PluralEyes 3 automatically create a bin when dragging a clip into the proper window of the interface. And even better still would be the ability to add all your angles at once and have PluralEyes 3 place each one into its own separate bin.
Sure, you often have camera starts and stops, which means all those clips need to be in the same angle/bin. But often you don’t. I worked on a music video right after PluralEyes 3 shipped where we had six different passes of 29 single clip angles on each pass. That was 29 times to add a new bin, then 174 times to drag an angle to the bin (I reused the bins I had created by deleting the angles from the bin). Actually it was double that as I did it incorrectly the first time and had to do it all over. That made me really wish there was a way to clear out all the angles you have in a bin. One would think you could just select all the waveforms on the timeline and delete, but that didn’t work. I had to click into each bin, one at time, to delete each angle. Often I chose just to open a new PluralEyes 3 project and start from scratch. It was a choice of delete old clips or add new bins. Really, six in one hand and a half dozen in the other.
But since that music video edit happened, an update to PluralEyes 3 has added an important new feature, something they call the music video workflow. It’s a way to quickly and easily add all your takes at once.

You can access the very handy Add Media Files for Takes… feature via the Edit menu to click the button that looks like 4 stacked lines at the bottom of the project window.
Just as the name says, that opens up a dialog box that allows you to pick all the takes for, say, a music video, all at once. Oh, how handy that would have been with the 29-take music video I mentioned above. Or the 80-something angle one I did a few years ago. Why even mention the dragging nightmare of the music video above when the current version of PluralEyes 3 has added this feature? It illustrates to me how the former Singular Software team, now part of Red Giant, listens to its customers. I had complained rather loudly that they needed some way to import more than one take at a time.
Once that setup is done and you click the Synchronize button, one of the best features of PluralEyes 3 is on display: speed. This new version is fast. It was able to sync those angles in the project mentioned above using the camera’s scratch audio (and one music track) in, quite literally, seconds. I didn’t even have time to open up Instagram on the iPhone and take this shot before sync had completed. Setting up for the sync can sometimes take a lot longer than PluralEyes 3 actually doing the sync!
When sync is complete and you’re satisfied with the results, it’s time to export a list to send back to the NLE for edit. In the past, you had to buy a separate version of PluralEyes for each NLE you wanted to support. Now all the Mac non-linear editors are supported in the one application. This is a good thing, and that might be an example of Red Giant’s influence, as they’ve always provided multiple software hosts for one purchase of their other products.
Exporting is simple. Click the Export Timeline, and you’re presented with a window to choose which type of NLE-supported file to export. Both Final Cut Pro 7 and X are supported, as well as Adobe Premiere Pro and Avid Media Composer. If the app supports multi-camera clips, there is an option to export those as well.

Exporting all happens from the same window. Why is Media Composer grayed out? More on that in a minute.

Another cool export feature is the ability to export brand-new in-sync media files. While not always needed, it’s a nice option to have — but be aware that this could double your disk space requirements.
One thing missing is the option to choose where to save the exported sync lists that you’ll then import into an NLE. They automatically go into a PluralEyes folder in your Documents folder. Not a big deal, but it’s rather silly to not be able to choose where to save those files. Often jobs have very specific places where all production-related documents are stored, so it would be nice to choose where those files go. Thankfully, when you export new media files from the Export Timeline box, you do get to choose where those new files are stored.
As for Avid Media Composer, it is supported by PluralEyes 3 but you have to go a bit PluralEyes old-school and set up all the angles in a timeline in Avid Media Composer. After that, you export an AAF from that timeline and bring that AAF file into PluralEyes 3. While it does take extra time, especially if you’re cutting a large music video — which is something that Media Composer still does better than any other NLE, IMHO — it’s nice to still be able to see the sync taking place, and check the sync, in PluralEyes 3. Unfortunately, there have been a few times where PluralEyes 3 didn’t work (or crashed) when working with the Media Composer AAFs. I’m not sure if that’s a PluralEyes 3 problem or something with Avid’s AAF export and media handling. It makes me really wish Avid Media Composer could import and export some type of XML, as most all developers I know tell me XML is much easier to work with.
If you must go old school with PluralEyes, then check your download folder. It includes version 2 of PluralEyes as well as their other syncing app, DualEyes. These are part of a $199 PluralEyes 3 purchase. That’s a nice touch.

The whole PluralEyes collection is part of a PluralEyes 3 purchase. That includes the older standalone version 2 of the products, including PluralEyes for Avid Media Composer.
With PluralEyes 3, the Singular Software team and Red Giant (which bought Singular out just before the release of PluralEyes 3 last year) have taken an amazingly useful tool and made it even better. It’s faster and provides much-needed interaction and feedback between editors and their media. If it overcomes a few niggling setup tasks (and the occasional crash), it might be darn near perfect. PluralEyes 3 faces some competition these days, what with Final Cut Pro X having audio syncing built-in, not to mention the new syncing kid on the block, WooWave. I can’t imagine that Adobe isn’t working on something similar for Premiere Pro, given some of the technologies currently in Adobe Audition. And I would hope Avid is dreaming up something similar for Media Composer. That competition has kept Singular Software innovating, and PluralEyes 3 easily at the head of the class, when it comes to this rather mundane task of syncing multiple cameras for editorial.


I am on the beta release team for the windows application and still waiting for it. They have assembled a pretty good looking group of testers that are anxious to see how it operates with our platforms.
This software has paid for itself over and over again in the time it has saved me synchronizing DSLR footage with my Zoom audio. If you shoot separate video and sound or multi-camera, BUY IT.
I recently acquired Premier Pro to replace FCP. I would add that abandoning FCP after using it exclusively since FCP 2 has been painful but we move on. I would hope that Plural Eyes develops it’s software to run on Premier which, for me, will be running on a Mac. Although I’m done with Apple editing software(Forget FCPX!), I will continue running on Mac hardware. Hopefully, the developers will keep this in mind since professional editors are adopting this solution all across America.
I am the developer of Woowave Sync Pro. Inviting all those willing to try alternatives to Plural Eyes to download free trial and test it out. There is a route to free license as well. woowave.com
I just bought this and haven’t installed it yet. Your article talks only about syncing multiple cameras to sound. Is it worth having this software if you only are syncing independently recorded sound to one camera?