You don't want your micro-budget film to look like what it is. Shooting pro-style is essential. Fortunately, you live in the age of affordable enabling electronics and DIY. If you look at shooting as a utilitarian task necessary to get your ideas in the can, you will fail. I'm not going to mince words—you will be wasting your time, and you might be an idiot. Just sayin'…
Shooting is an art. It requires creative planning and execution. Micro-budget filmmakers have an advantage, in a way. You are forced to use small, light, affordable equipment, which gives you remarkable shooting flexibility. Director Sean Baker told me he's been able to go out in public and shoot a scene; and the passers-by don't even know he's shooting because everybody is shooting something with iPhones these days. People don't pay any attention.
I spoke with Sean, whose Sundance hit Tangerine was shot entirely on the iPhone 5s with an anamorphic lens. It will be released in theaters by Magnolia Pictures on July 10, following a successful festival run. His total shooting micro-budget is under wraps, but it would surprise you. Believe me, if you have talent and put in the creative and physical and mental effort, your dream of creating a releasable film is not pure fantasy.
As for shooting with the iPhone, he said that small cameras (DSLRs, for example) and iPhones let you shoot in public with a very low profile. He mentioned that you sacrifice depth of field with the iPhone, but with the anamorphic adapter from Moondog Labs, you can definitely achieve a cinematic look. You'll amass lots of small savings. For example, the small form factor enabled him to shoot in an open diner without having to rent the entire place and fill it with extras.
He acknowledged that the smart phone has advantages and disadvantages, but having shot the entire film on his phone, he's obviously found ways to make it work. “The sound equipment is what people noticed," he said. "It's a lot bigger and more involved and obvious. You don't want to skimp on sound.” (See? I spoke with wisdom in my sound blog.)
Okay, I'll assume you'll be using a DSLR to shoot because of its lens options and other advantages, but you might consider collecting additional footage with your iPhone or GoPro Hero from different angles. These will give you shooing flexibility. If you shoot with the iPhone, consider getting the Filmic Pro App as well as the Moondog anamorphic device to get widescreen, truly cinematic results. More below.
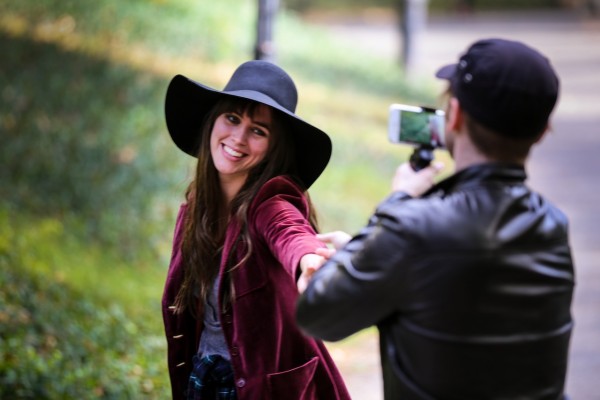
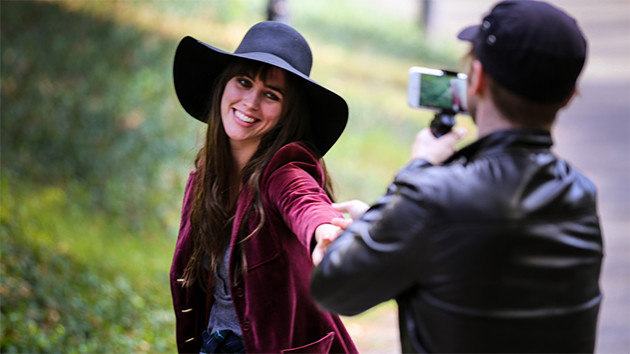
Tristan Pope shooting Romance in NYC
A Few Rules to Shoot By
Here are some general rules to keep in mind when setting up takes.
Rule 1: If you can afford a DP, or can con one into working with you, do it. If he or she is good, you will not regret it. Shooting is both art and science, and there are likely more variables than you can take into account by yourself.
Rule 2: Be careful not to overuse trick shots. You probably want a few for interest, but if you do too many, they lose their impact, become hokey, and actually diminish your film.
Rule 3: Keep your camera moving. Lock-off shots have their place, but in general keep moving with dolly shots, Steadicam-style shots, drone shots, tracking shots, crane shots and sliders. Avoid handheld unless you're making a point—shaky shots annoy audiences. All of these can be shot with improvised and DIY equipment, especially using three-axis active gimbals.
Rule 4: Interesting angles are nice from time to time, but your audience is used to and expects reasonably conventional, well composed shots.
Rule 5: Short talking-head shots can be locked off, but long ones should be smooth tracking takes from the front and and back (mix it up) while subjects are walking, or otherwise locomoting.
Rule 6: Choose your lenses carefully. Each lens brings its own feel to your shoot. Get to know what those feels are. A zoom lens is not always (or even often) your best choice, but it can come in handy, especially in impromptu shots in public where you can change focal length quickly to grab something serendipitous.
Rule 7: Watch your lighting! You'll likely be shooting on location, so time your shots to take advantage of the sun's position. Remember that the golden hour is fabulous, but also fleeting. It's probably a good Idea to shoot flat so that the look can be refined in post. Natural light can be amazing, but use fill where you need it, making it look natural. DIY lighting is a good place to save money these days.
Rule 8: Speaking of locations, pick places you can dress before shooting. Not a rule, but try to shoot an empty plate of your locked shots so your editor can clone out when the boom dips into the frame or a hawk swoops through your shot. On that note, also remember that it's better to be stuck with the boom in the shot than to have lousy dialog coverage.
Rule 9 Generally a two-camera shoot will be better than a one-camera shoot, and that's a good reason to have an extra camera on hand—and you always do with your iPhone.
Rule 10 Avoid distracting action or awkward perspective in your shots. If there is action in the background, make sure it helps to tell the story.
Shoot Steady
You don't want too many locked-off, shots and hiring a full-bore Steadicam operator is expensive. So is the equipment. Don't do it—not on your budget. One of the fantastic advantages of using small cameras and smartphones is that you can get shots that are impossible with the big Panavision cameras. Okay, the resolution isn't as high and depth of field can be a problem (fix it in post), but with the new stabilization options for small cameras you can shoot professional tracking and crane shots with ease on a tight budget. This opens all sorts of creative doors for you. There are even highly affordable specialized stabilizer platforms for iPhone and GoPro. I like the Feiyu 3 Axis G4 Steady platform on a long “Ultra Reach” super light carbon fiber poll [pictured] that provides a means to simulate moderate crane shots beautifully.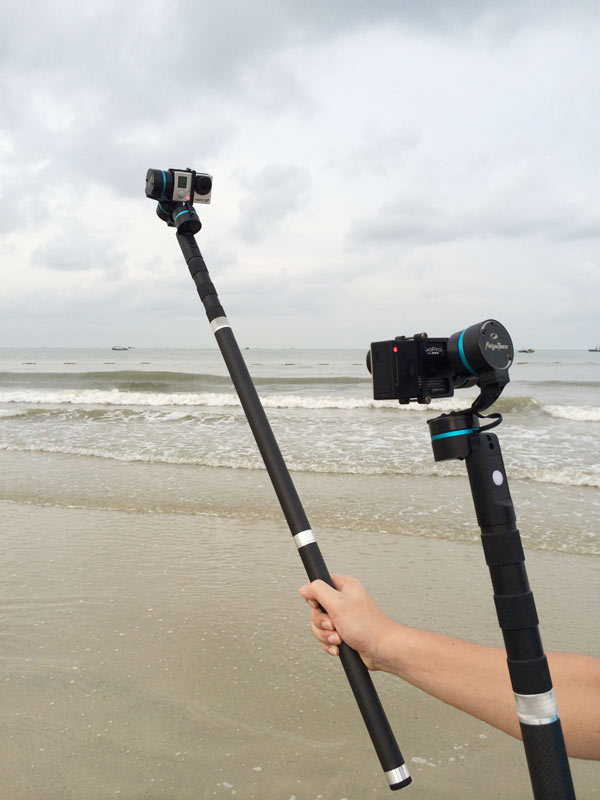
Another alternative that only recently became available is the cheap three-axis controller and motor system. For example, you can buy a kit from Hobby King for a fully stabilized, motorized Turnigy camera rig for a camera like the Canon EOS 7D Mk II, with its interchangeable lens options and excellent image quality. You can even get older Canon EOS-M bodies on eBay for less than $200.

Turnigy Pro Stedi-hand with 3 Axis electronics.
If your budget is really tight and you're handy, make your own excellent actively stabilized camera rig using the AlexMos three-axis gimbal control and motorized camera rig kit from Turnigy (also Hobby King). The rig with motors is about $148 and the 32-bit AlexMos controller will run about $170. I've seen clones for even less. You'll have an amazing platform. It takes a little bit of technical knowhow, but It's not difficult and you'll near the equivalent of a $7,000 pro stabilized rig. You can buy a complete unit with a mic mount for about $500. You might want to rent the superb MoVI rig (upwards of $8,000 to buy), but I'd go the less expensive route until my films started making money.
A note on Drones
I'm assuming I don't need to say much about the very cool uses of drones for shooting, but in the next section I'll mention a few uses you many not have thought of. I built my own high altitude drone aerial camera rig for about $3,200. I don't recommend going that route. Mine is a bit of overkill and takes two operators, a pilot and a camera person. It's more than you likely need. I've been checking out the DJI Phantom 3. It has a really nice camera, three-axis stabilization and a cost of about $1,300. It's their low end drone, but it is amazing in performance and affordable. There are a number of alternatives on the market; take the time to see which one works best for you.
A well-stabilized drone camera rig, like one of the products from DJI, can be used in very interesting ways to make unexpected shots. For example, let's say you have two people walking under a beautiful trellised walkway toward the camera, talking. Instead of making it a dolly or Steadicam shot, try having your drone fly in front of them as they walk. It's as steady as handheld, so nobody will know, until—and here's the cool part—they finish the dialog and suddenly the drone zooms away from under the walk cover and upward in an unexpected reveal of the big picture. Bad guys are coming to get these lovers and we see them approaching from our sky view.
Also, you can set a drone in the sky—like a jib but higher—and have it pretend to be a locked-off camera filming some action below. The audience will wonder how you found a camera position there. Similarly, you can film mountain climbing from a steady position 20 feet out from the cliff. Use your creative instincts and create interesting shots…just don't overdo it.
Be Creative
You can simulate crane shots with your GoPro or iPhone on a Feiyu setup with the extension poles. Hold the camera about 10 to 12 feet in the air and keep it slowly moving to cover your shot, then dip down to actor level for dialog. Another excellent use is for low-angle shots. I know it's been used too much, but it works. Follow a character from behind, shooting just their feet as they lead us into a new scene. For example, you open on a wide shot of the bustling street market, you cut to a high shot of a young woman walking from above and behind, and then you lower your camera on a pole until it is aimed at her unusual shoes. Follow as she walks through the market and into a bakery. Keep shooting as you pull back to reveal her approaching the main counter with all sorts of interesting goodies on display. She hands the baker a suspicious package.
You will be forgiven for using this trite move because people accept it as being in high-end movies. No two are alike, so maybe no one will even notice that it's been done before. Remember, it's easy to make this this a long, boring take, but you can be creative and keep it entertaining and informative while forwarding your story.
Here is an inspiring short video using the MoVI camera rig that you can think about when using a less-expensive rig. Build on the ideas you see here, adding your own twists and improvements. Next year, you'll be able to afford an actual MoVI.
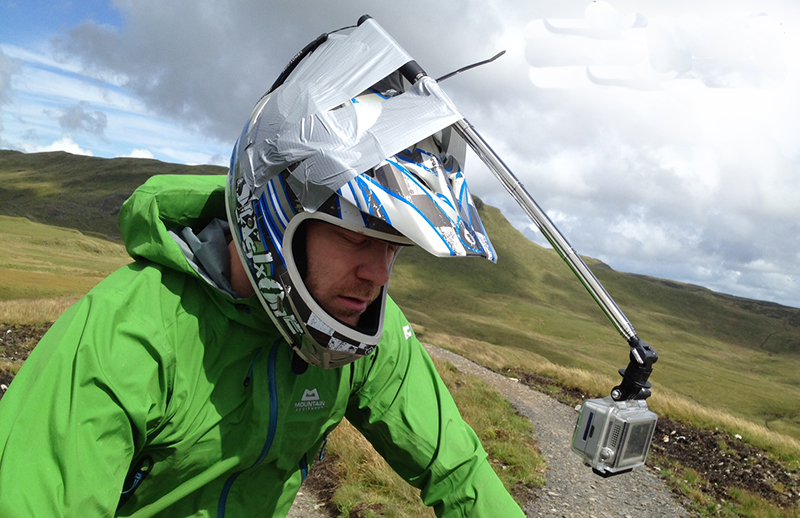
Another fairly inexpensive way to capture amazing shots is to rent a Segway. In L.A. you can get them set-up for camerawork, but a regular Segway can be used if you head-mount your Feiyu-stabilized GoPro and use your head as the rig! (Avoid using the software stabilization in your camera. It's not at the pro level you need for credibility.)
Overall, you want to be shooting smooth, clean takes that will carry your story forward and make your editor happy. Just make sure you've planned 80% of it well. Sean Baker tells me he often gets shots he didn't plan that work for the final. Well, that too. But planning really helps keep your movie organized, especially out-of-sequence shoots.
Just for fun, here's a behind-the-scenes piece about another movie still in production, shot on an iPhone 6: Romance in New York.
Here's the trailer.
Shoot with a Partner
Even though you are shooting with a small camera, there will be times when your cameraperson could use a hand. When the camera assistant isn't helping, she can be shooting from a different angle, giving your film editor lots of good raw material for composing a visual symphony.
One of the really cool things a camera assistant can do is take the camera on a pass-through. For example, the Feiyu-mounted GoPro (or iPhone) on the long pole can be pretty versatile. For example, you're on roller blades, following a car pulling up to a stop with a pretty girl driving. Roll alongside, filming, and push the camera-on-pole slowly through the open passenger window as she opens the door and leaves the car. Follow her out the door, where your assistant is waiting out of sight to take the pole and keep the shot going. She walks towards an office building and the camera raises up to 15 feet off the ground and stops shooting as she enters. This could be a fabulous way to reveal action that doesn't look at all low-budget.
Long takes are all the rage these days and, when well-planned and executed, can add credibility to your film. Look at Birdman. Almost the entire movie in one take … well, it was in dozens of takes, but it was edited to look like one take. You get the idea.
Shoot for a Film Look
Several factors go into getting an authentic film look. It's not just the color grading.
Shoot anamorphic.
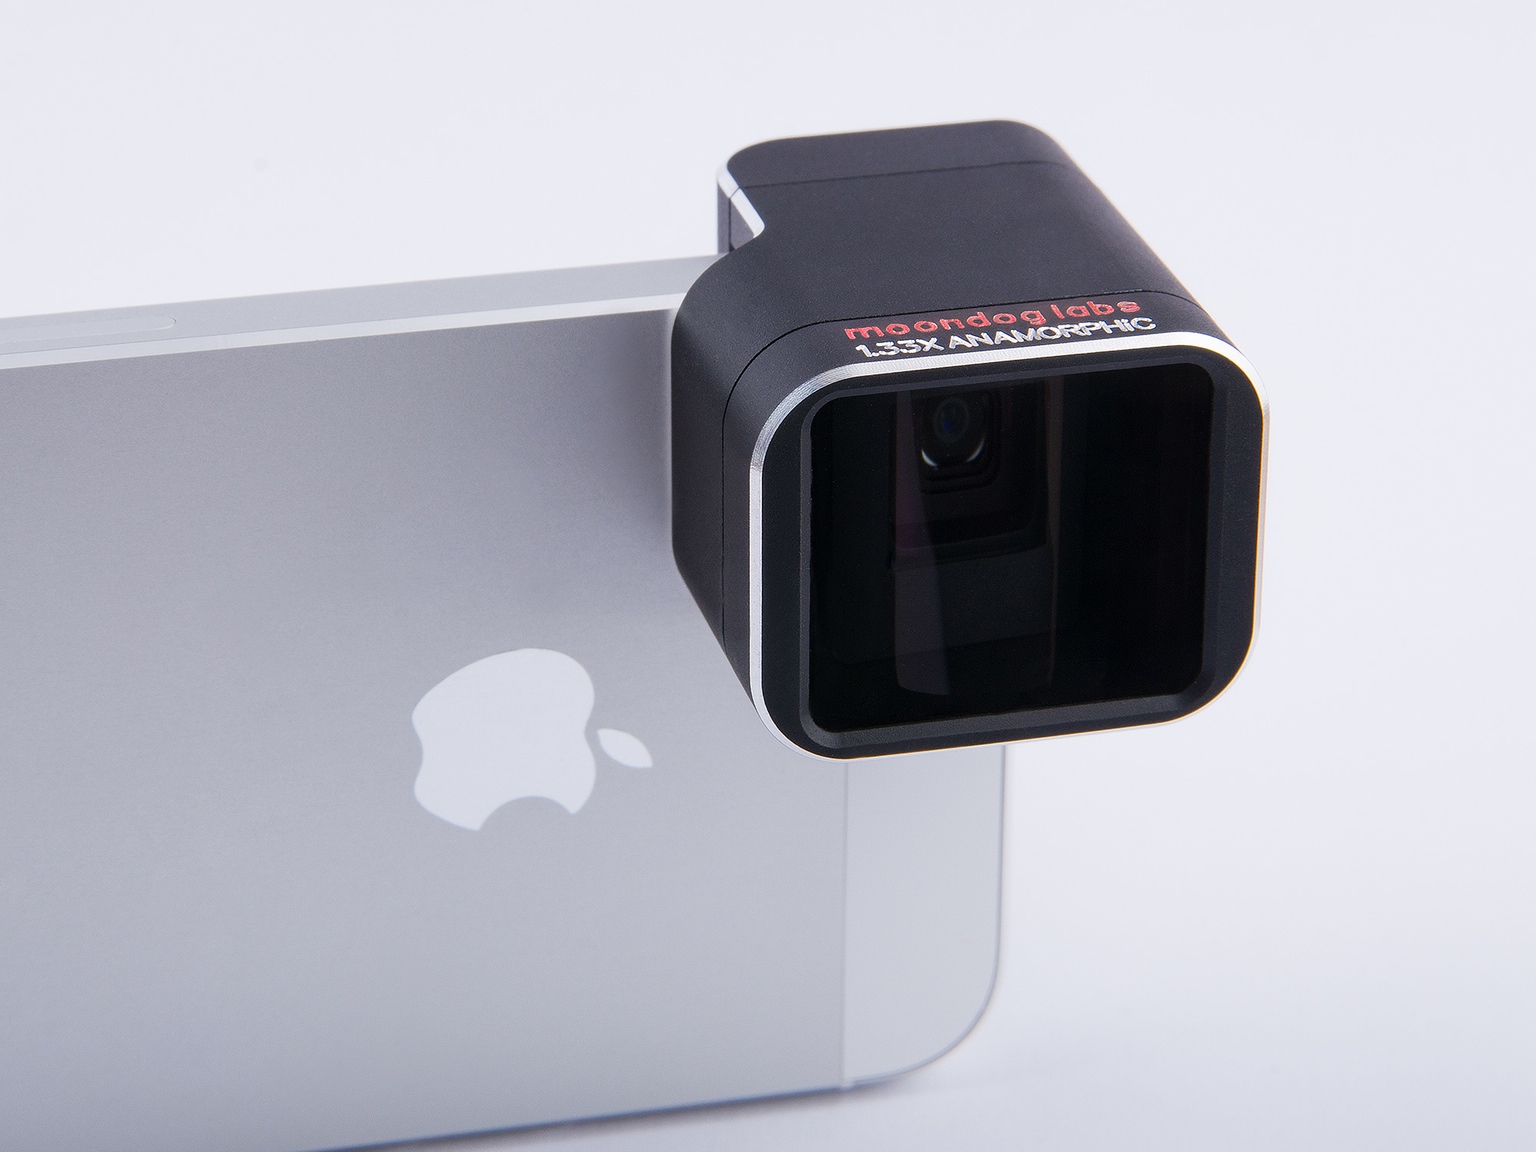
It's an investment, but you need that 1.33 horizontal squeeze on your DSLR to get a widescreen cinematic look. True anamorphic lenses are very expensive for DSLR cameras, but you can get an anamorphic adapter much cheaper. They're a pain in the ass to use, as you have to focus both lenses. Nevertheless, It's a cheap way to get stunning 2.39:1 anamorphic footage.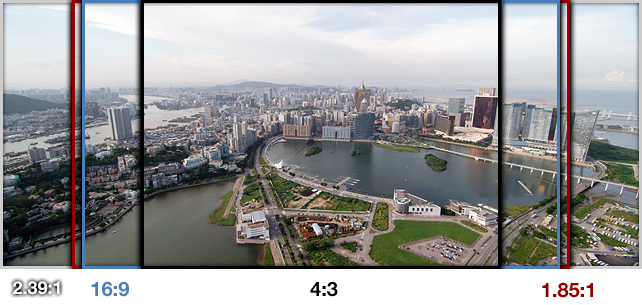
When using a DSLR, one thing often overlooked is that with some anamorphic adapters you need to have the camera in 4×3 format when using an Anamorphic lens. At 16×9, the squeeze comes out a bit off. Some of the newer adapters, like the SLR Magic Anamorphot 1.33X–50 anamorphic lens attachment, are designed to shoot properly using the entire 16×9 image plane. So read the instructions.
The Moondog Labs lens for the iPhone is outstanding. Moondog Labs is run by a pair of optical engineers, Julie Gerstenberger and Scott Cahall. Scott has also designed mobile phone cameras, HUDs and 3D visualizers for some of America's top optics companies. The price of these lenses is extremely reasonable, considering they are excellent anamorphics.
One thing that you might not think about is the anamorphic lens flares that give night shots a cinematic quality you won't ever find in normal lenses. They can be added in post but, as we all know, ”keep it simple” is the rule for post.
Set Shutter Speed and Frame Rate
If you've ever looked at a low budget film that was shot using normal video parameters, it looks wrong. There is no motion blur and it's too perfect. You definitely don't want that.
I recommend shooting at 24fps (24p), which is how emulsion film was shot. Now you need to adjust your shutter speed to get a little motion blur. As a rule of thumb, set your shutter speed at twice your frame rate. That means a shutter speed of 1/50 is just about right for 24p.
Next, control your depth of field (DOF) with your aperture setting. This is one reason that it's easier to get film look with a DSLR than an iPhone—faster lenses give you more control over your DOF. You should already know that larger aperture openings mean shorter depth of field. Don't overdo it, but a compressed DOF, especially on close ups, adds to that cinematic feel. You can fake it in post for your iPhone shots, but it's not quite as effective.
If you don't do much shooting, you might wonder: How in hell do I control the light if I have a fixed frame-rate, a fixed shutter-speed and a fixed aperture? Good question. Fortunately, all DSLRs let you control the ISO, and there is your answer. You lose control of the grain, but grain can be good.
In bright daylight at full aperture you're likely to be overexposed, even at the lowest ISO. Thus, you'll have to sacrifice depth of field to get a proper exposure. That's just the way it is.
DSLRs usually have all sorts of in-camera compensation and looks. I recommend that you not use them, shooting with flat, neutral settings. I believe it is always better to let your color grader tweak the look in one of the excellent color grading programs like Red Giant Color Suite on PC or DaVinci Resolve on the Mac, where they have tons of options. (This opinion is not universally held.) Color grading is absolutely essential to make your mini-budget film look high-end. It's something you have to study, so it's not a quick fix. It takes talent and knowledge.
One reason I talk a lot about stabilization is that it is a major component of the film look. You can use Warp Stabilization in Premiere Pro or After Effects, for example, but it's better to give your film editor already smooth, professional footage.
Here's a simplistic view that you can work from: Dark green or blue tones convey a serious or dispirited tone. A warm palette suggests happiness. (If it's too warm, heat.) Monochrome palettes can suggest flashbacks or dream sequences.
In between there are all sorts of “looks,” and the art is to get it right for the mood of your film. A lot of young filmmakers tend to overdo it in this department. Use good judgment and a bit of restraint. The person who does your color grading is very important. Get a colorist with experience. The software grading possibilities are endless and include not just color, but atmosphere. Sparkles on water and dreamy sequences in the sunset can all be enhanced to be so much better than reality—which is part of what we do.
If you must, use the automatic “film look” settings to get you in the ball park, but I suggest just using them as a starting point and adding something personal. Essentially you can get a fairly cinematic look by tweaking the shadows to the blue side and the highlights to the warm side. Then slightly brighten the highlights and pull down the shadows until it looks right. This is just a very rough idea of what grading is about.
Finally, a cinematic look has to take into account aspect ratio. Typically, a ratio of 21:9 (2.40:1) looks cinematic. 16:9 is easier, but looks less cinematic. This is why Sean Baker chose to shoot this ratio for Tangerine.
Should I Shoot 4K?
That's a big question. Everything is going 4K, or so it seems. But there are many disadvantages for the micro-budget project, not the least of which is the massive amount of expensive storage necessary. Add that to the fact that absolutely no one but an OCD techie with binoculars in the audience will see any difference. It's all the rage, as all new technical advances are, but my position is that you absolutely should not shoot 4K if you are an indie producer. If you are on a micro-budget, it would be insane. Moreover, many of the gains you get by filming at 4K will be lost in the compression steps that take place before your film even reaches the majority of its viewing audience.
And think about post. Handling all that data is expensive in terms of time and equipment. It takes longer to render your finals after editing and post-production tweaking. It can kill you. You'll have all this data and no money to do post left because you assumed 4K would cost about as much as 2K. That's not going to happen. Unless and until 4K becomes a requirement to get a distribution deal, your best bet is to avoid it completely.
Wrap
There is no way I could adequately cover shooting a micro-budget film effectively here in one blog entry. What I hope I've done is make you consider various aspects and possibilities that you may not have thought of before. With Google, you can gather information to teach yourself more of you need to know. There is a website designed specifically to support self-taught film makers with discussions and resources: www.mentorless.com. Take a look if you're sailing on your own.
This series continues. I've written drafts of several more entries, and I'm not sure which I will do next. But I'm in the mood for opening titles. You may not realize it, but you can grab or lose the audience with your opener. I'll tell you that I have clicked off several movies when I hated the opening titles. That mean's it is of particular importance to low-budget filmmakers because it's not about big expense. It's about creating an opener that will grab and set the mood. There are things you should know.
Until next time…get out there and shoot.
-P-
Topics: Blog Peter Plantec Shooting anamorphic feiyu gopro iPhone microbudget filmmaking moondog labs turnigy
Did you enjoy this article? Sign up to receive the StudioDaily Fix eletter containing the latest stories, including news, videos, interviews, reviews and more.

It’s refreshing that you advise against shooting 4 K for a micro budget. So are yo saying that 1920×1080 will have enough resolution for theater projection and that 4 K won’t add anything? It’s just a question. In that case, the BMPCC might be the best deal, with the SLR anamorphic adapter. Or should we should 4 K with a GH4 or a NX1 and downgrade to HD? What do you suggest for the micro budget? As a note, I don’t believe shooting raw. I believe that ProRes 4:4:4 in more than enough for color grading and I also believe in getting right in the cam with minimal correction on the DN range later in post. Thanks for answering.
Hi Philippe, I advise, on a tight budget to avoid 4k completely. It is not required and has so many problems associated with it that it will kill your budget and cause aggravation. Remember the important things are your creative illustration of your story in film. I highly recommend going anamorphic. As for getting it right in camera, some directors like to do that. It’s a matter of personal style. I like the freedom involved in color grading on the box. The options you get in contemporary color grading applications are amazing. I use Red Giant Magic Bullet Suite…especially Colorista. As for the Black Magic…it’s personal, I prefer the GH4, admittedly I’m a bit of a Lumix fan. And I do admit the 4k down-converted looks really good. I just don’t care for the look of the Black Magic, so it requires more work in post for me. You can see some revealing Side-by-sides of the BMPCC vs the GH4 here where you can make your own decision. I hope that helps. https://www.youtube.com/watch?v=BzEI0Sni610
Yes, I have to say it’s not worth it, from that footage, to bother with the headaches of shooting raw with the black magic. I think the GH4 is quite amazing. I’ll probably go with either a GH4, a NX1 or maybe that new Sony A7r.
You have done good research Philippe, each of those is an excellnt choice. I am,partial to,those exqusite Leica Lenses on the GH4 though…just me.
Now I’m surprised about what you said about the black magic cams. Could it be that you watched footage of people who didn’t know how to color grade? Also, a lot of people buy those cams and hook up cheapo lenses to them, which of course will make the image soft? Frankly I wouldn’t go through the headache of shooting raw, but ProRes 4:4:4 must be nice and more than enough and allow beautiful grading and latitude.
You could be right about that. I have limited experience with Black Magic where I knew what I was looking at was shot with it. I agree there should be enough there to tweak the images nicely.
Keep in mind that, to this day, most digital cinema presentations are sourced from 2K DCPs. For instance, Jurassic World goes to theaters as a 1998×1080 file, and that’s the biggest blockbuster movie ever made.
Peter and I might disagree on the merits of 4K overall, as I believe you can see the difference between a 4K and a 2K presentation theatrically, at least if you sit fairly close to the screen (and I do tend to sit up front when I go to the movies). And as 4KTV becomes a reality in home theaters, having a 4K master might give you a leg up with streaming services like Netflix and Amazon, for whom 4K has become a selling point.
There is a middle ground that may also improve your image — you can shoot at 4K and then downres to 2K/HD for release. You’ll save money by working with 2K media instead of 4K in post, and an HD image that began life with a full 4K of detail should look better than one that originated at HD resolution. (This is why Jurassic World looks so good—the crew shot with both 35mm and 65mm film, which gives them a level of quality that carries through to the finished DCP, even at “only” 2K of resolution.)
Anyway, if we’re talking about microbudget filmmaking, Peter is right — 4K is going to add an unnecessary expense in exchange for an uptick in quality that will likely go unnoticed by the majority of your viewing audience. If you’re really scraping your film together on a shoestring, odds are there are things you can spend money on that will make a bigger difference to the quality of your film than a resolution upgrade.
Edit: Forgot to mention that, even with all the buzz around 4K, the dominant camera for feature-film production is still the ARRI Alexa. It’s selected by many very demanding, high-end DPs with good taste and tons of filmmaking experience. Resolution isn’t everything.
Thanks for your input Bry.. It’s interesting, I feel 4k totally works on TV, especially the new Samsung curved sets. It makes a clear difference. And we’ve been using 4k at Mundos Digitales in Spain on the big screen…and I see the difference when sitting close. But for the average audience going to see a microbudget film, 2k is just fine…they won’t notice any lower quality…betcha.
Oh yeah, I absolutely agree. The average audience member will endure a lot without noticing (or at least caring) that the picture is not at its best. That doesn’t mean you shouldn’t endeavor to provide the best image quality at all times — but it does suggest that 4K is one of the corners you can cut when money is tight.
Great, so it seems that the Black Magic Cinema Camera, that shoots 2.5K in a nice color space does offer the best of both world to somebody on a budget?
Philippe, except…I’ve not liked the quality of images coming out of the Black Magic. something muddy or dull about them. Maybe that is just me and I’m a believer in post. You can fix almost anything in post.
I was DP on a feature film, shot in 2012 with Canon 60D DSLR’s, 1920 x 1080, mainly with Canon OEM 50mm primes. We shot in the Technicolor Cinestyle flat picture profile…and very little sharpening was added in post. I was afraid that the overall look would be overly soft when projected on the Muvico theater screen, but it looked gorgeous.
Rick, you sound like an enlightened DP…you’d be an asset on any low budget production….I’m thinking. It is absolutely amazing how good a micro can look with a good DP and proper post.
A lot of solid advice in the article. I just finished my 2nd micro-budget feature as a DP and have learned there are a few technical issues not adequately addressed in this article. Audio is a perfect example of one of the problems. Unless there is a significant budget in post for ADR or you are shooting doc style you need solid audio. To get “that” you will want a pro or pro level audio team. It’s very hard to get them or any one else who can work for the length of the entire project for free. You need consistency. The same goes for almost every department on set. A lot of people will have scene in a home. Most folks homes have inadequate lighting for almost every camera there is to date, so you need to light the set. Lightning a full wide kitchen scene is usually tricky and takes time, experience and again consistently. The term micro-budget is misleading because to many that it basically “free”. Finally, camera movement is tricky. I find some shots so technically difficult to achieve perfectly for every take a risk which needs to be understood. Few people want to do 10 takes. If half of the shots are fails due to technical difficulties, then you may want to just do a simpler technical shot.
Steve, I appreciate you sharing your experience. I totally agree on the sound. I spent two blogs on sound for low budget productions. I agree with shot planning and lighting as well. I advise keeping shots reasonably simple. With affordable active steady rigs you can get some very tricky shots in tight quarters, fairly constantly with eaach take. Again thanks for your participation.
Rick and bfrazer,
Thanks for the feedback. So he’d make sense to shoot with a GH4 in 4 K, with a BMCC in 2.5K or with the BMCP at 4k and downgrade to HD to have a better HD then? Better than just acquire in HD with a BMPCC.
Yeah, there are two options — you can shoot in 4K (or 2.5K) and then downres the footage in post, which should give you a really solid HD image. Or you could shoot with the 4K (or 2.5K) camera recording HD, which should also give you a solid HD image, depending on how robust the camera’s image-processing hardware is, and you wouldn’t have to burn through so much recording media. If you have the time and resources, do a quick test shoot and color grade and output and then compare full 4K capture and 4K post to full 4K capture and HD post to HD capture and HD post. Only that will really show you the relative quality you’re going to get with whatever camera you choose, and give you an idea whether it’s worth it to you to record 4K out of the camera.
Yea and no. Remember I’m tawk’n microbudget here for theatrical release. The Lumix camera will capture great images and i agree if you properly downsize it may actually, to my eye, look better than native 2k on my computer monitor. However, you put a lot of unnecessary burdon on your system and your post operation having to deal with all that media and you still end up with 2k and nobody will see it side by side. So it kinda becomes kind of an unnecessary techie experiment that WILL EAT INTO YOUR BUDGET…unnecessarily. Put that mony on the screen in more productive ways, like better sound and/or lighting. JMO.
WOW, so insightful and greatly appreciated! Thank you so much for taking the time to put this post together! I’m in the process of upgrading to the GH4 and am trying to make sure that it will help my production process more rather than hinder. I don’t really see myself shooting in 4k, since I don’t think my computer can handle it, but having the option is always nice!
Hi Nicki,
That is a wonderful camera for cinema. Make sure you pay attention to the settings I suggest. They add greatly to the film look in that camera. My advice would be to shoot at 2K and that will give you great raw material to work with in edit and vfx. Also If you haven’t read my articles on Sound…that is a critical component and you don’t want to use sound from your camera’s mike.
Yes! I’ve been pairing with my Zoom H4n, but am also looking into what affordable lens to pair as well. I’m looking more for that depth of field for documentaries, but one that’s also great with low lighting. Any suggestions for the GH4?
Nicki, I’m not a fan of zoom lenses for Cinema…yes they have their uses, but as you realize you need much bigger aperatures for DOF and low light performance. The G4 is a slightly odd duck when It comes to lenses and how they use that beautiful sensor. However this image sensor has a crop factor of 2.0. So, to get a lens with the same angle of view (or field of view) as a standard 50mm lens on a 35mm (full frame) camera, you actually need a 25mm MFT lens. This has implications for DOF. Multiply or divide by two to convert between the two standards. This means you have to open the lens far more than you expect to get the depth of field you want. In bright situations you’ll have to compensate by lowering your ISO setting. It just takes getting used to. Also consider getting an anamorphic adapter as suggested above to improve the cinematic quality of your work…that alone is a whole new area to research.
So do your research. Here are two good articles that may be of help…also remember that anamorphic presentations are extremely cenematic when well done.
http://www.bhphotovideo.com/explora/video/tips-and-solutions/how-emulate-super-35mm-4k-video-panasonic-gh4
Also, you can adapt lenses for the G4, but never forget that those native Leica lenses are some of the world’s best.
http://suggestionofmotion.com/blog/panasonic-gh4-lens-options-adapted/
Sorry MFT lens referred to below equals “Micro Four Thirds”.
Tristan Pope shot a beautiful short called “Dancer’s of Zurich.” He used a stabilized Iphone 6 to shoot the whole thing and it’s impressive. https://youtu.be/YF6ZCFWcCmU
A very informative article- but I have to respectfully disagree with the “don’t shoot 4K on a microbudget” statement. I just shot a small budget feature , “Providence” in 4K on the Sony FS7, and the XAVC files are great quality and a manageable size. 4K allowed for much latitude in post for reframing and scaling when needed. This feature is not costing any more for production or post than my last one, shot in 1080P. That being said, I’m in complete agreement that 4K is a long way from being a widespread consumer format.
“The process of filming on an iphone was just as intriguing as the actual film.”
Really?
That’s the nail in that movie’s coffin.
Things never to say out loud about your film –> #1.
If you are afraid of comments like this then yes don’t say it, if you like to be truthful, than say away, say away 🙂
I Need Advise for shooting with GoPro with Adapter and Cine Zoom Lenses and
Prime lenses.
I’m rethinking my 4k statement. Technology has advanced so rapidly that my original objections are becoming irrelevant.