Honey, They Shrunk My Pro HD Cam!
We’ve known for years that this camera was coming—or one that would be very similar. Everything was ready to converge for the optimal size, resolution, and price. We might not get a personal jetpack or robot maid, but we would get a pocket-size camera with a cinema-like resolution and broad dynamic range. Now that the $995 Pocket Cinema Camera is here, is it all that we imagined it might be?
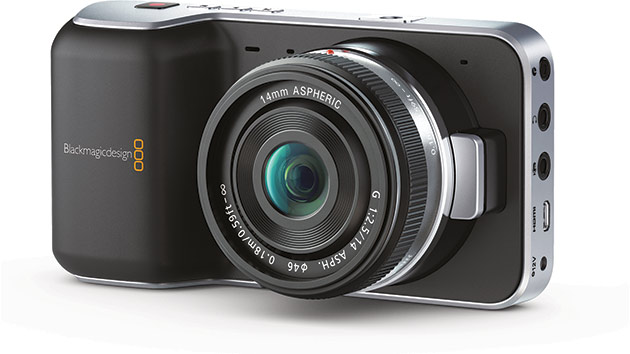
On the whole, this is the camera we were looking for. The build quality is especially impressive. Due to its magnesium alloy chassis, it feels heavier than you might expect. The outer shell consists mostly of polished metal and a rubberized surface that’s fairly easy to grip. The 3.5-inch LCD screen on the back has only an 800 x 480 pixel resolution, but it does a decent job of displaying subtle colors and shading. That’s particularly important, because this camera can record a dynamic range of 13 stops.
It’s also capable of recording to a RAW file format. Unfortunately, that capability isn’t quite ready, even though this model is shipping in limited quantities. According to the folks at Blackmagic Design, the RAW file option will be available through a firmware update. Apart for the small size and 13-stop dynamic range, the RAW capability is the most exciting aspect of this camera. With RAW, you’ll have a greater latitude to adjust the color balance and exposure levels during post processing. The RAW format will also result in larger files, so be prepared to stock up on the fastest SD cards available, such as the recommended SanDisk 64GB Extreme Pro SDXC, which has a write speed up to 95 megabytes per second. The SanDisk 64GB Extreme SDXC and SanDisk 128GB Extreme SDXC are also on the recommended list.

When you load the ProRes files into your NLE, you’ll notice that the colors and contrast levels tend to be dull and washed-out. That’s because the images are optimized for post-production, not end-user delivery.
At press time, the Pocket Cinema Camera saves its video files to just one format: lossy-compressed ProRes 422 at 1920 x 1080. On first viewing, the files seem flat with dull colors and washed-out contrast levels. That’s because ProRes is an intermediate codec that’s intended for post-production rather than end-user delivery. You want an image that gives you the most latitude for color-grading the digital video. Once you load these files into your color-grading application or NLE, you can adjust the saturation and contrast based on the extensive data that’s stored in the file. From the camera’s menus, you can set the dynamic range for either Film (for the full 13 stops of light) or Video (for compatibility with the Rec. 709 video standard). The camera currently records at 23.98p, 24p, 25p, 29.97p, and 30p frame rates.
When available, the raw file format will be a lossless-compressed CinemaDNG raw. You’ll be able to take a first pass at the raw files in the free version of DaVinci Resolve, where you can color-grade the footage and convert the output into a format your NLE can accept. Assuming that the Pocket Cinema Camera proves popular, there’s a good chance that many NLEs will adopt this camera’s variation of the CinemaDNG format and let you to read the files directly, allowing non-destructive editing through your entire workflow.
Bring on the Glass
Blackmagic Design chose a Micro Four Thirds (MFT) lens mount for this camera. It was a smart move, though you should be aware of some issues that could affect which lenses would be a good fit. The chief advantages of the MFT lens mount are the wide availability of the lenses, small size of the lenses, and relatively low price for most of the lenses. Leica and Zeiss are starting to offer MFT-mount versions, so the quality is also there, if you’re willing to pay for it. Some MFT lenses even have IS (Image Stabilization) built-in because some manufacturers chose to have it handled by the lens rather than the camera.
The downside to MFT lenses is that they are sometimes cheaply designed, based on the assumption that the lens distortion can be corrected in the manufacturer’s cameras. With the Pocket Cinema Camera, you won’t have that in-camera correction with those lenses. As a workaround, you may be able to send the file through Adobe Photoshop Lightroom 5 (now that it has limited video support) and have it correct the file’s optics based on the profile for that specific lens.
A major advantage for the MFT lens mount is the inexpensive adapters that let you use a wide range of other lenses. I tried the Pocket Cinema Camera with Leica (M-mount), Canon (EF-mount), Olympus (OM-mount), Voigtlander (M-mount), and Kern-Paillard (C-mount) lenses using the appropriate MFT adapters for those lens mounts. The Canon and Olympus lenses worked well, though many DSLR lenses (especially zoom lenses) are too large and unwieldy for the camera body. This is a small camera that you can casually bring with you and use less conspicuously than a full-size HD camera. A large DSLR lens runs counter to that scenario. The Leica and Kern-Paillard lenses would be more practical because of their smaller size.
Keep in mind that the focal length for these lenses will change when mounted onto a Pocket Cinema Camera. The sensor in this camera is 12.48mm x 7.02mm. That’s roughly equivalent to Super 16. Most still photography lenses are denoted by their 35mm-equivalent focal length, which is 2.8 times larger. Here’s the calculation: 35mm / 12.48mm = 2.8 ratio. A lens that’s 50mm on a full frame DSLR would have an effective focal length of 144mm on a Pocket Cinema Camera. A standard lens becomes a telephoto. To end up with a standard focal length, you’ll need to start with a wide-angle lens. For example, to achieve an effective 50mm focal length, you would need an 18mm lens.
I did try a Leica 18mm f4 Super-Elmar-M lens attached to a Panasonic DMW-MA2M M-mount adapter, and it looked very good with no apparent distortion. I also tried three Kern-Paillard C-mount lenses — a 10mm f1.6 Switar, a 16mm f1.8 Switar, and a 75mm f1.9 Macro-Switar — attached to a RainbowImaging MFT-to-C-mount adapter. They looked good, except for some corner softness and slight vignetting with the 10mm. The three Switar lenses are from an old Bolex 16mm film camera. I didn’t think I would ever use them again. (I bought them back in 1978 from some guy named Barry Sonnenfeld, as he was leaving NYU.)

If you have some old C-mount lenses around, you might try them on the camera using a MFT to C-mount adapter. Unless they were designed to cover a Super 16 field of view, they may vignette and focus a bit soft in the corners when used on a Pocket Cinema Camera.
You’ll also be able to use some lesser-quality lenses with this camera, because most of the distortion in those lenses is in the outer portion of the frame. The Super 16 field of view doesn’t extend to the edges of the frame with most lenses (such as APS-C and full-frame lenses), which are designed for a larger area of coverage. C-mount lenses would be the exception, as many of them have slightly less coverage than would be needed for a Super 16 field of view.
Onboard Control
I also tried the Pocket Cinema Camera with a Panasonic Lumix 14mm f/2.5 lens that was provided by Blackmagic Design for this review. Because it’s a native MFT lens—and this camera has an active MFT mount—the lens and camera were able to share the aperture and focus settings. With this lens and many other MFT lenses, you’ll be able to control the aperture and focus using the buttons on the back of the camera.
How does it work? Press the Focus button once to auto focus. Press twice, and you’ll bring up focus peaking. With manual MFT lenses, with non-MFT manual lenses attached with an adapter, or with non-MFT automatic lenses attached with a passive adapter, you press the Focus button once to bring up focus peaking. For aperture control, you can press the Iris button once to set an automatic exposure (it averages all the light values). To set the aperture manually, you press the up and down buttons in the directional array on the back of the camera.

The Blackmagic Pocket Cinema Camera’s menus are almost identical to the ones found in the Blackmagic Cinema Camera. That should make it easy to switch back and forth between the two cameras.
Once you become used to it, the focus and aperture controls will seem logical. However, you may have a difficult time switching back and forth between this camera and Blackmagic’s Cinema Camera or Production Camera 4K. On those cameras, you manually control the aperture settings using the forward and reverse buttons on the transport controls. Those controls are on top of the Pocket Cinema Camera rather than on the back panel, as they are with the Cinema Camera and Production Camera 4K.
As you’ve probably figured out, you’ll have to shoot manually with many of the non-MFT lenses. M-mount and C-mount lenses are designed for adjusting the focus and aperture on the lens itself. Many DSLRs lenses are not optimized for manual shooting, and can be awkward to adjust, even allowing for their larger size.
While, in theory, you can use any MFT lens on the Pocket Cinema Camera, there are differences that make some of the lenses difficult to use properly. Some MFT lenses with built-in IS do not have a physical IS on/off switch (the Panasonic Lumix 14-42mm MEGA OIS is an example). That’s a problem for the Pocket Cinema Camera because it requires that the IS switch on the lens be set to the “on” position. In addition, this camera’s 2.8x focal length multiplier is higher than the 2.0x focal length multiplier that’s more typical for an MFT camera. So it will be difficult to find native MFT lenses that are truly wide-angle on the Pocket Cinema Camera. Standard focal length MFT lenses that wouldn’t normally need IS on an MFT camera could be a bit shaky on the Pocket Cinema Camera. They may require a tripod, steady rig, or other means to stabilize the camera.
Practical Concerns
How does the Pocket Cinema Camera handle real life situations? It’s remarkably quiet, as it doesn’t require a cooling fan like the Cinema Camera or Production Camera 4K. When I placed the camera up to my ear after I had turned it on, I heard nothing at all. For that reason, the built-in microphone might be usable in some situations, with a few caveats. It has a very limited frequency range. It records at a relatively low volume. And when you press the controls on the camera or make adjustments on the lens, it picks up those sounds as well. On a busy street with a constant level of ambient noises, you might be OK. In a quiet room, you’ll need to switch to an external microphone.
The onscreen menus let you adjust the audio levels from the built-in microphone. And there’s a separate adjustment for the line levels from an external microphone. Unfortunately, there are no audio meters, either within the menus or along the status strip that shows some of the key settings while recording. That limits the usefulness of the built-in microphone. While you can adjust the audio levels, you’ll have to do it mostly through trial and error.
Interestingly, the Pocket Cinema Camera has a stereo microphone input, where the microphone input on the Cinema Camera and Production Camera 4K is mono only. Along with the 3.5mm stereo jack for audio input, there’s a 3.5mm stereo jack for headphones. For external monitoring, a micro-HDMI jack outputs 10-bit 4:2:2 video at 1920×1080, as well as 24-bit 48kHz stereo audio.
If you prefer to keep everything compact, you’ll depend heavily on the 3.5-inch LCD. The screen has a matte finish, but it does wash out in direct sunlight. The camera has a nice, balanced feel when equipped with proportionally sized lenses. On the other hand, it can be front-heavy and awkward to hold when paired with a medium-to-large DSLR zoom or a wide-angle low-light rangefinder lens (such as the Leica 24mm f1.4 Summilux-M). The camera is warm to the touch when operating for more than about 20 minutes. Mine never became hot.
I found the battery indicator on the LCD to be somewhat erratic. After shooting on-and-off for about a half hour, the indicator showed the fully charged battery had dropped to 32 percent. Just a minute or two after plugging it in to recharge, the indicator jumped up to 73 percent and stayed there. According to Blackmagic Design, the removable battery should last for approximately one hour of continuous shooting. That may be optimistic, as I was getting about 40-50 minutes with the display at the default brightness setting. The battery should charge in approximately 1 hour and 15 minutes when the camera is switched off, and approximately 2 hours when the camera is switched on.
In case you’re wondering, the Pocket Cinema Camera doesn’t include an external battery charger. As shipped, you’ll need to charge the battery while it’s still inside the camera. But don’t let it throw you. I was able to confirm with Blackmagic Design that the battery is interchangeable with Nikon’s EN-EL20 camera battery. Nikon’s battery chargers are compatible, as well.
You’ll want to keep the camera sensor well away from the sun. Like the early Red One, this camera suffers from the “black sun effect.” Some CMOS sensors are prone to forming a black spot (or pixel inversion) when the lens is pointed to a very bright or concentrated light source, such as the sun. It can occur even if the sun is glimpsed briefly through forest leaves. I encountered this with the Pocket Cinema Camera. The black dot went away, but only after marring several shots. Red was able to cure this problem (or, more accurately, make it less likely to occur) though a firmware upgrade. Blackmagic Design is aware of the issue and will presumably be able to do the same. Until then, you’ll need to be especially careful when pointing the camera upward.
In a similar vein, some CMOS sensors are prone to excessive blooming. You may even see “white discs” form, where exceptional highlights appear as strongly delineated, often rounded shapes that spill into other areas. I didn’t encounter this with the Pocket Cinema Camera that I reviewed, but others have reported it and have posted some troubling examples online. Again, Blackmagic Design is aware of the issue and is looking into it.
Singular Sensation
These kinds of quirks might be dealbreakers with other cameras, but considering the overall quality of the video from the Pocket Cinema Camera, they may be just minor inconveniences (with the possible exception of the blooming issue). Compared with the video-mode HD from DSLR cameras, the video from the Pocket Cinema Camera is far more pristine and better suited for color grading, even in its current ProRes 422 format. Compared with dedicated production-quality HD cameras, the Pocket Cinema Camera is small and lightweight, and it writes to readily available media. There are many quality MFT lenses that are a good match in size and cost for this camera. And being able to experiment with a wide range of older lenses via inexpensive MFT adapters makes this model a great choice for those who like to tinker with different set-ups.
While this camera has no real outside competition at the moment, the buying decision is complicated by the recent shift in price for the Blackmagic Cinema Camera. It dropped from $2,995 to just $1,995. The Cinema Camera has a 2.5K resolution and includes the full version of DaVinci Resolve, which normally sells for $995. If you had planned to buy the software anyway, the two cameras would be essentially the same price. The Cinema Camera uses SSD drives rather than SD cards because of the higher demands of 2.5K raw video. It’s also larger and heavier, though its reduced 2.2x focal length multiplier would make it easier to shoot wide-angle. That smaller size could be an important advantage for the Pocket Cinema Camera if you need to be inconspicuous in a crowd. With a small MFT or C-mount lens attached, it might appear to be a consumer-grade camera.


If only there would be eng-style servo zoom lens for all-around work for MFT. I’ve been waiting for that since Panny’s AF100. Now just 3 years and counting…
Sony NEX EA50UH
http://pro.sony.com/bbsc/ssr/product-NEXEA50UH/
“It includes a newly developed E-mount servo zoom model SELP18200. It features: variable zoom speed,’
It’s APS-C rather than MFT but it could be what you want.
AFAIK, since e-mount has shorter flange focal length, which makes it pretty impossible to use e-mount lenses on mft camera. Otherwise my choise would be now BMPCC & SELP18200.
One update – Blackmagic has just announce a fix for the black sun effect has via firmware update: http://forum.blackmagicdesign.com/viewtopic.php?f=2&t=12577&sid=e3c332fe389574a86b1fff9e339b2129#p79553
See http://hybridcamerarevolution.blogspot.com/2013/09/blackmagic-fixes-black-sun-but-for.html for details.
Otherwise, a nice overview of the camera.
Thanks for the well-written, straightforward review. Very informative and refreshing.
Thank you for the review! I want one – it will be a replacement for my GH1. When will they be shipping?
Blooming Orb issue already resolved as Blackmagic re-calibrated the sensors although that require some to return the cameras. Additionally the black dot sunspot has also been resolved in the latest firmware update.
C Mount on M4/3 group
https://www.facebook.com/groups/cmountm43/
Hello. I am waitng for shipping. When it will bee shipping? In next 2-4 mounth ? 🙁
“A lens that’s 50mm on a full frame DSLR would have an effective focal length of 144mm on a Pocket Cinema Camera”
This is wrong. Lenses do not change focal length. What changes is the field of view. Depth of field and magnification characteristics of that focal length do not change. Please stop spreading this fallacy.
no what it says is 100% correct, so what bullshit are you saying?
if you using a 50mm full frame lens on the “Blackmagic Pocket Cinema Camera” which has a crop factor of “2.88x” the lens will lend up been 144mm focal length, here is the calculation; 50 x 2.88 = 144
Sensor size does not affect the focal length, depth of field or magnification of a lens. How could it? Your field of view is the only thing sensor size will change. You could say that 50mm lens has the field of view of a 144mm on a digital 35mm sensor but there is no such thing as “effective focal length.”
I wouldn’t say that ProRes was for intermediate use only – about 85% of the deliverables I create for major TV networks and studios are mastered in ProRes 422 HQ, even if they’re not shot in that format. You also didn’t mention that the camera uses the HQ codec, which has a higher bitrate than regular ProRes. True, it’s not designed for grading use, but shouldn’t be dismissed out of hand just because it’s a lossy codec.
“Blackmagic Design chose a Micro Four Thirds (MFT) lens mount for this camera. It was a smart move.”
No, I don’t think it’s smart, I think it was chosen because the small sensor was economical.
I’ve already met someone who discovered… trying to get a steady handheld shot with their Canon 50mm lens was impossible… because of the narrow field of view. A Super 35mm sensor would have been smart…
I’m waiting for Pocket Cinema Camera Ver. 2
A big thanks for the great review..I am a TVC director and have a Canon DSLR & some EF mount lenses.I am planning to buy a Blackmagic pocket cinema camera this week,can you please suggest me a cheap and best MFT to Canon EF convertor to use my current EF lenses that I have.
What other can you use to be able to use the autofocus feature of BMPCC aside from the Lumix14mmf2.5 you mentioned?