Step 1 Load and Render a Model
While this approach is applicable to any geometry object, in this example I use a Lamborghini model downloaded from www.turbosquid.com. First, delete any existing animation of doors and wheels. Create a camera and animate it to move around the car. Render an image sequence using any renderer like Scanline or mental ray. This is your projection map.
Select the body, doors, windows and hood. Create a Named Selection Set called Body, then hide the selection. Render again to a different image sequence. This is your base image sequence.


Step 2 Create Particles from Geometry
Open Particle View and create a simple Particle Flow system with Birth, Position Object and Display operators. Select and unhide the Body selection set. Add the selected objects to the Position Object operator. Select the PF_Source and set the Viewport % to 1.0. Set the Birth operator to 3,000,000 particles and Start and End to 0.
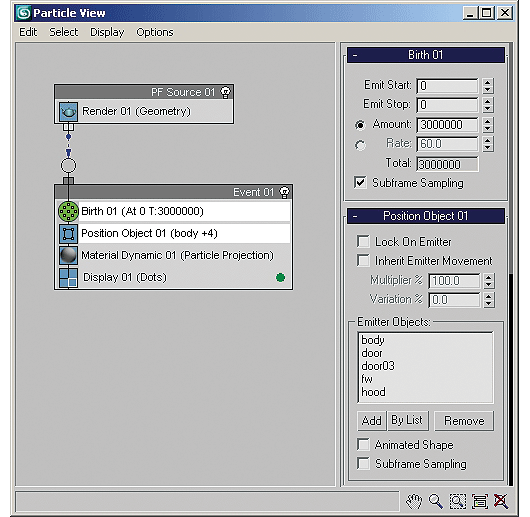
Step 3 Project Your Image Sequence
Create a Standard Material with a Camera Map Per-Pixel map. Select the animated camera, add a BitmapTexture and load the projection map images as an IFL sequence. Add a Material Dynamic operator; drag the Material to it.
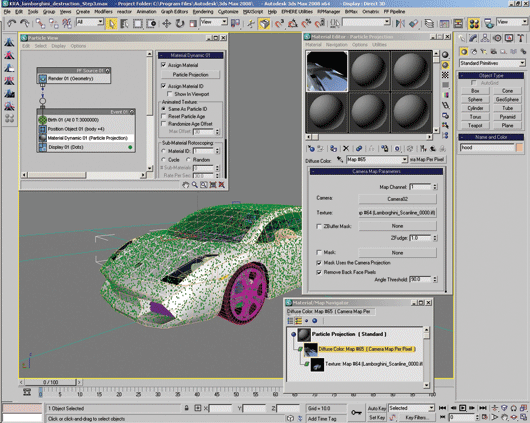
Step 4 Save to a PRT Sequence
Switch the renderer to Krakatoa. Switch the render mode from Render Scene Particles to Save Particles To File Sequence. In the Save Particles rollout, specify the PRT output path.
In the Channels rollout, set the Channels To Save list to Position, Color and ID. Right-click the Save Particles button and set the time to Current Range. Press the button to start saving. This will bake the particles, including the camera projection color, to disk.
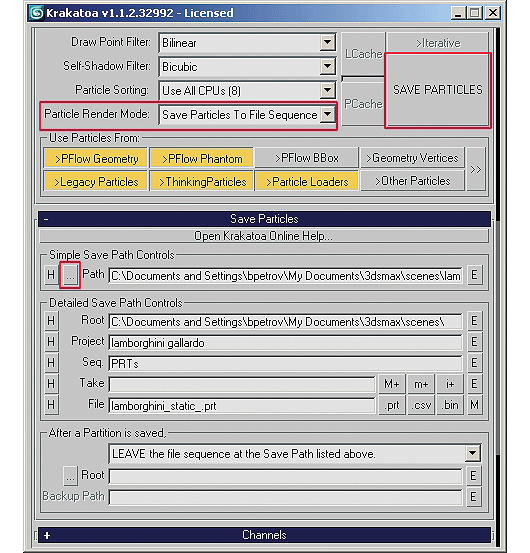
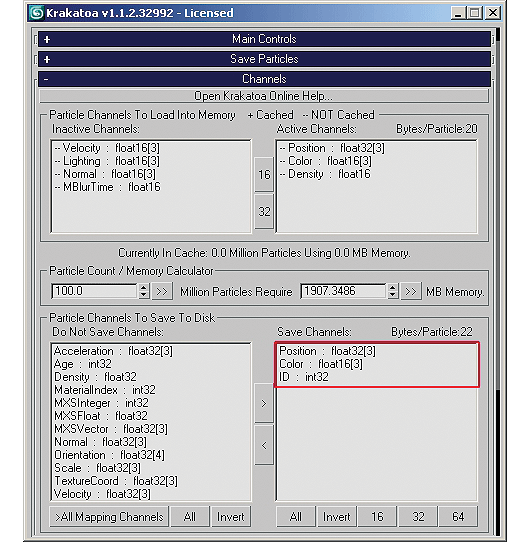
Step 5 Load the Sequence into Particle Flow Using Krakatoa
Next, disable the first Particle Flow and create a new Empty Flow. Then, drag a Krakatoa File Birth operator to Particle View and load the saved PRT sequence. Connect the PF Source to the new Event.
Step 6 Update the Particle Color
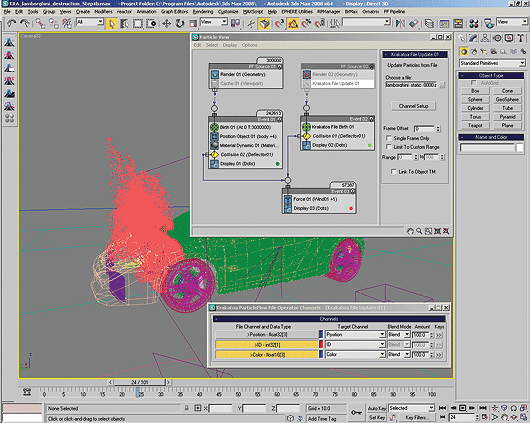
Add a Krakatoa File Update operator to the top PF_Source container and load the same PRT sequence. Open the Channel Setup dialog and enable the Color and ID channels. Position should be unchecked, which allows us to reuse the saved colors but move the particles around.
Step 7 Create the Disintegration Effect
Create a Deflector SpaceWarp in front of the car and animate it over 80 frames to pass through the whole length of the car. Add a Collision Test operator to the PFlow and pick the Deflector. Set behavior to Continue. Create a Wind SpaceWarp with Strength 0.5, Turbulence Amount 1.0, Frequency 0.1, Scale 0.1. Rotate at 30 degrees about X. Create a Drag SpaceWarp and set to 10% along X, Y and Z. Drag a Force operator to create a second Event, load the Wind and Drag SpaceWarps. Wire the Collision Test to the new Event containing the Force. Here is an optional step: The Krakatoa File Birth always loads 100% of the particles, 3 million in this case. To tweak the Forces interactively, clone the Collision Test to the first Particle Flow and wire to the same Force event as the second system. Using only 1% of the particles, play with the Wind and Drag settings to adjust the look of the cloud. Choose the Body selection set and invert the selection. In the Matte Objects rollout, press the Create/Update Matte Selection Set button. Reselect the Body selection set and Hide Selected.
Step 8 Bake the Disintegration Effect
The particles could be rendered in Krakatoa directly from Particle Flow, but it is a better practice to bake them to a PRT sequence. This allows for fast Motion Blur and Density tweaking and rendering on a render farm at the cost of disk space. Add Velocity channel to Channels To Save to allow for Motion Blur. Enter a new save path and press Save Particles.
Step 9 Render the Disintegration Effect
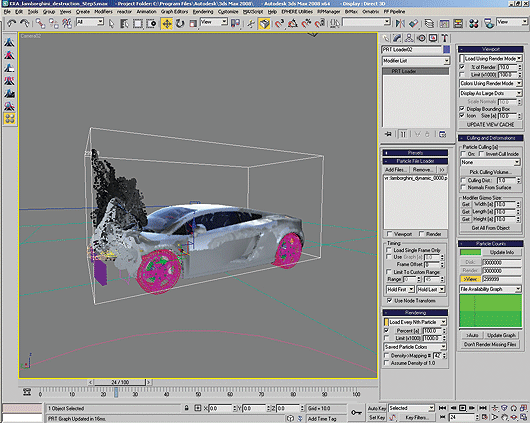
Open a new copy of 3ds Max (or wait for the previous step to finish). In the same scene, create a PRT Loader, uncheck Use Node Transform and load the sequence saved in the previous step. Make sure you disable all Particle Flows.
Set Krakatoa to 4 passes Motion Blur, Jittered Motion Blur on. Set Final Pass Density to 2.0/-1. Specify a render output path. Render the range from 0 to 100.

Step 10 Composite the Final Result
Load the base image sequence with the bodiless car and compose the Krakatoa rendering on top of it in a compositing application or 3ds Max Video Post. Save the result to a final sequence.

Tools Used: Autodesk 3ds Max, Frantic Films Krakatoa plug-in, TurboSquid model
Your Guide
Borislav “Bobo” Petrov
Technical Director/Krakatoa Developer, Frantic Films VFX, a Prime Focus Group Company
Bobo Borislav was born in 1968 in Sofia, Bulgaria, is a citizen of Austria and now lives in Canada. He discovered Autodesk 3D Studio (DOS) in 1993. An avid 3ds Max user since its first release in 1996, he has worked with the software in architectural visualization, multimedia design, game development and motion picture visual effects. In 2006, he was awarded the title “Autodesk 3ds Max Master.” Bobo is one of the driving forces behind the development of the Krakatoa Volumetric Particle renderer and is responsible for its somewhat overwhelming, but workflow-centric user interface.
Bobo Says Keep in Mind…
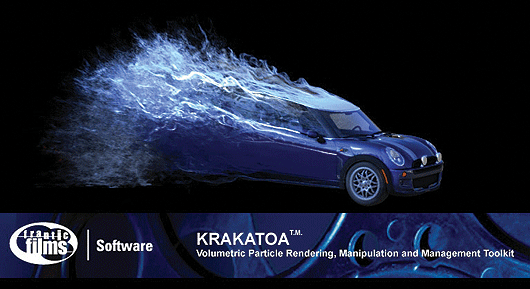
Since the first appearance of Krakatoa at Siggraph 2006, when it was an early beta, a demo animation of a car being blown into a particle cloud has been the signature shot of the product. Many users have since asked us how it was made, and we have published multiple solutions involving in-house camera projection tools, custom Particle Flow Tools Box #3 flows and a slower scripted solution in response.
Frantic Films VFX
www.franticfilms.com/vfx
70 Arthur Street, Suite 300,
Winnipeg, MB R3B 1G7
ph. 204.949.0070
bpetrov@franticfilms.com
Sections: Technology
Topics: Tutorial
Did you enjoy this article? Sign up to receive the StudioDaily Fix eletter containing the latest stories, including news, videos, interviews, reviews and more.