Frederic Lumiere on Editing Assets Inside the Shot
Watch a trailer for the program, above.
Historical recreations are expensive – time-consuming, detail-oriented, and especially demanding in terms of scale. If you’re trying to capture the essence of a historical event in camera, you have to find the right location, the right historically accurate props, and the correct number of actors to play out the events as they actually unfolded. That’s why director Robert Child determined that he would shoot footage for The Wereth 11 – the true story of 11 African-American soldiers behind enemy lines at the beginning of World War II’s Battle of the Bulge – one little piece at a time. He was getting elements in the can, not full scene tableaux. StudioDaily asked Frederic Lumiere of Lumiere Media to describe the challenge of editing a project that’s made up of tiny bits and pieces, rather than coherent shots and scenes. (The program debuted on National Geographic last week; it airs again today at 5 p.m. ET.)
Frederic Lumiere: Robert had seen a show the BBC did in England that took a very similar strategy, so he knew he wanted to spend a lot of time shooting assets rather than shooting scenes. He had, for each shoot, five or six actors and a whole bunch of different uniforms, along with a treadmill and a blue or green screen. He shot these guys doing different things – running toward the camera, running at a 45-degree angle, running away from the camera. Sometimes they were standing up, sometimes they were ducking down. They were both the American soldiers and the Germans, and it was all designed based on storyboards he had composed for 54 different shots.
When he came to show me the footage, having transferred everything onto a RAID, I had no idea what he had in mind. He said, “Here are the storyboards and these are all the assets. Go at it.” Now, I had done some blue-screen and green-screen compositing before, but I had always had bad experiences, especially with keys that didn’t pull very well. So I was horrified. I asked him, “Have you tried putting these together? Did you test the keys on a laptop to make sure it would work?” He hadn’t. I thought it would be a disaster.
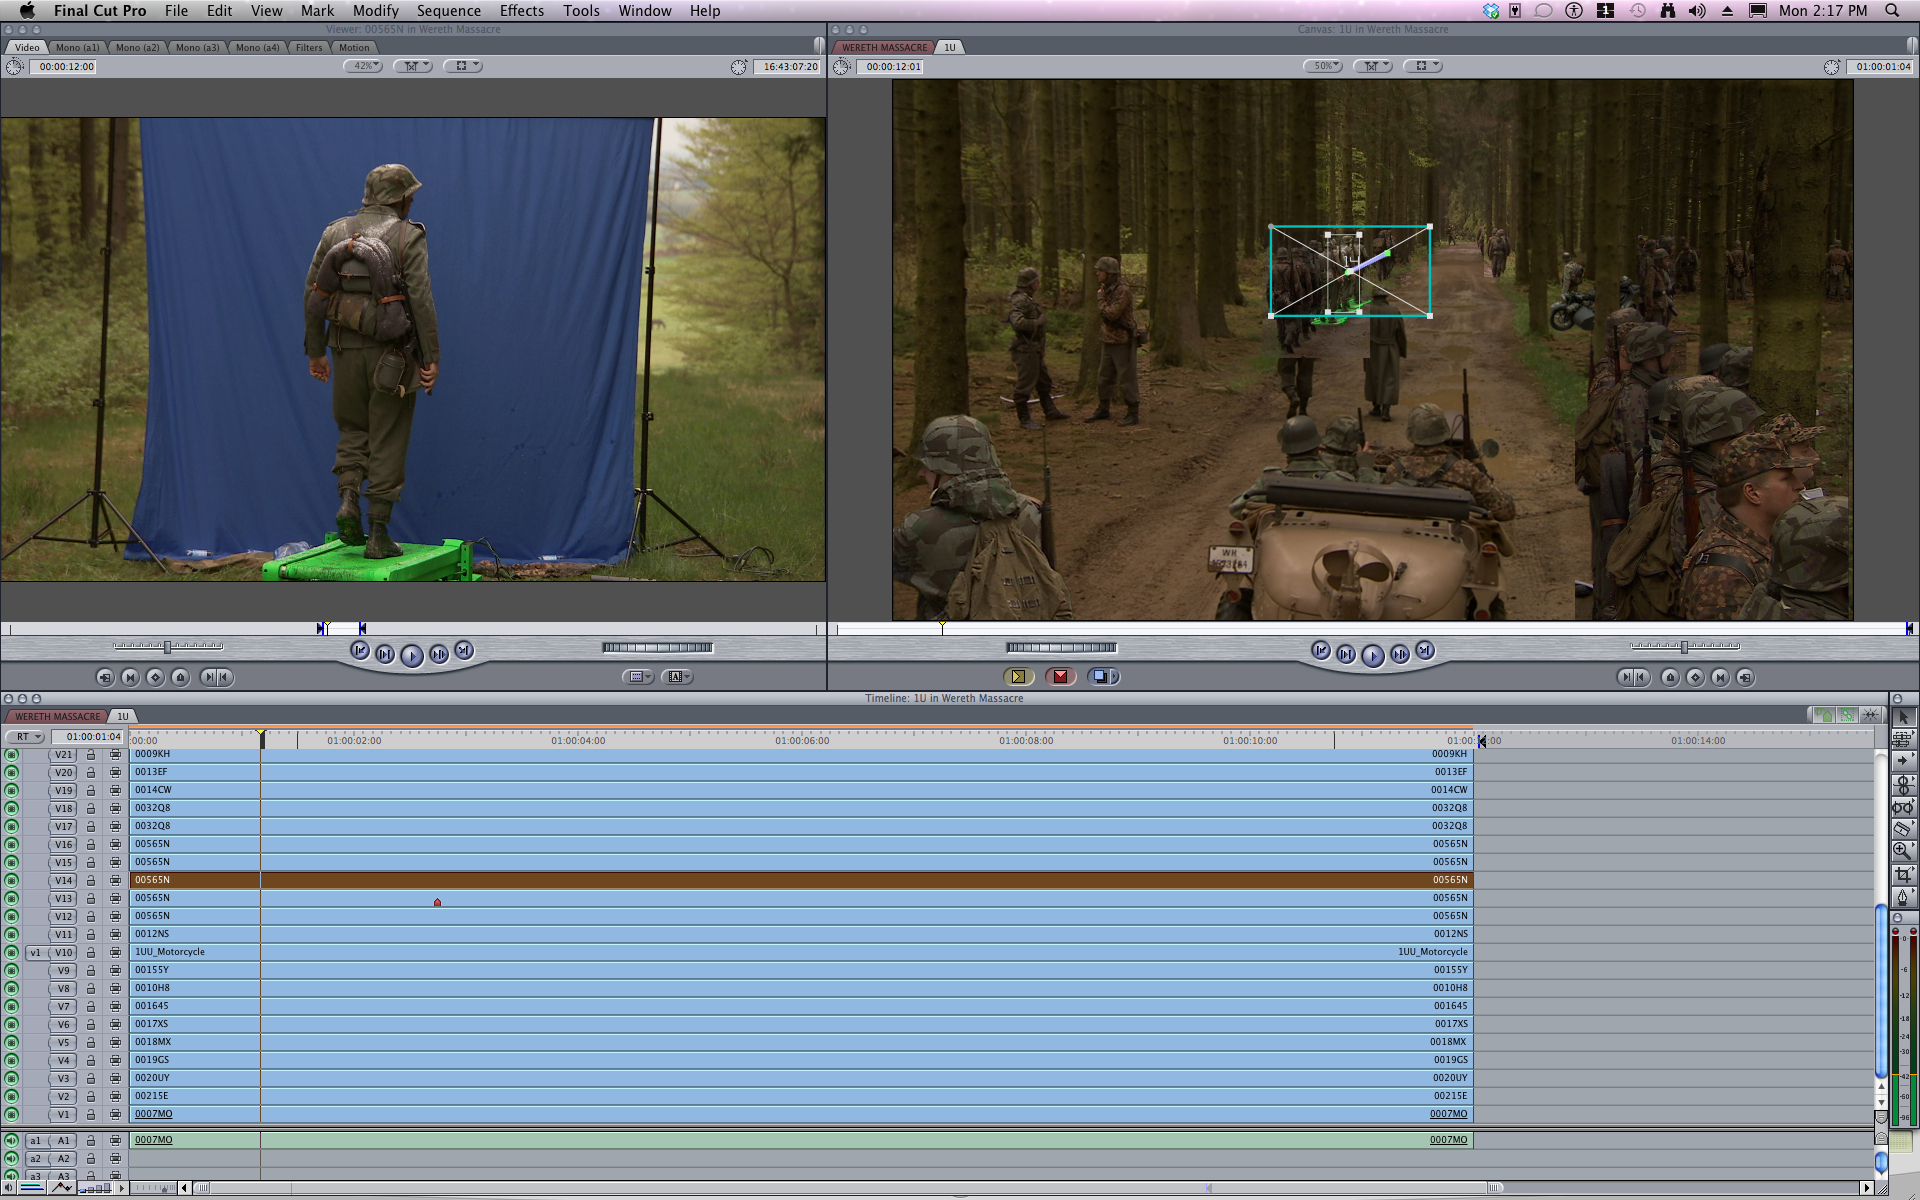
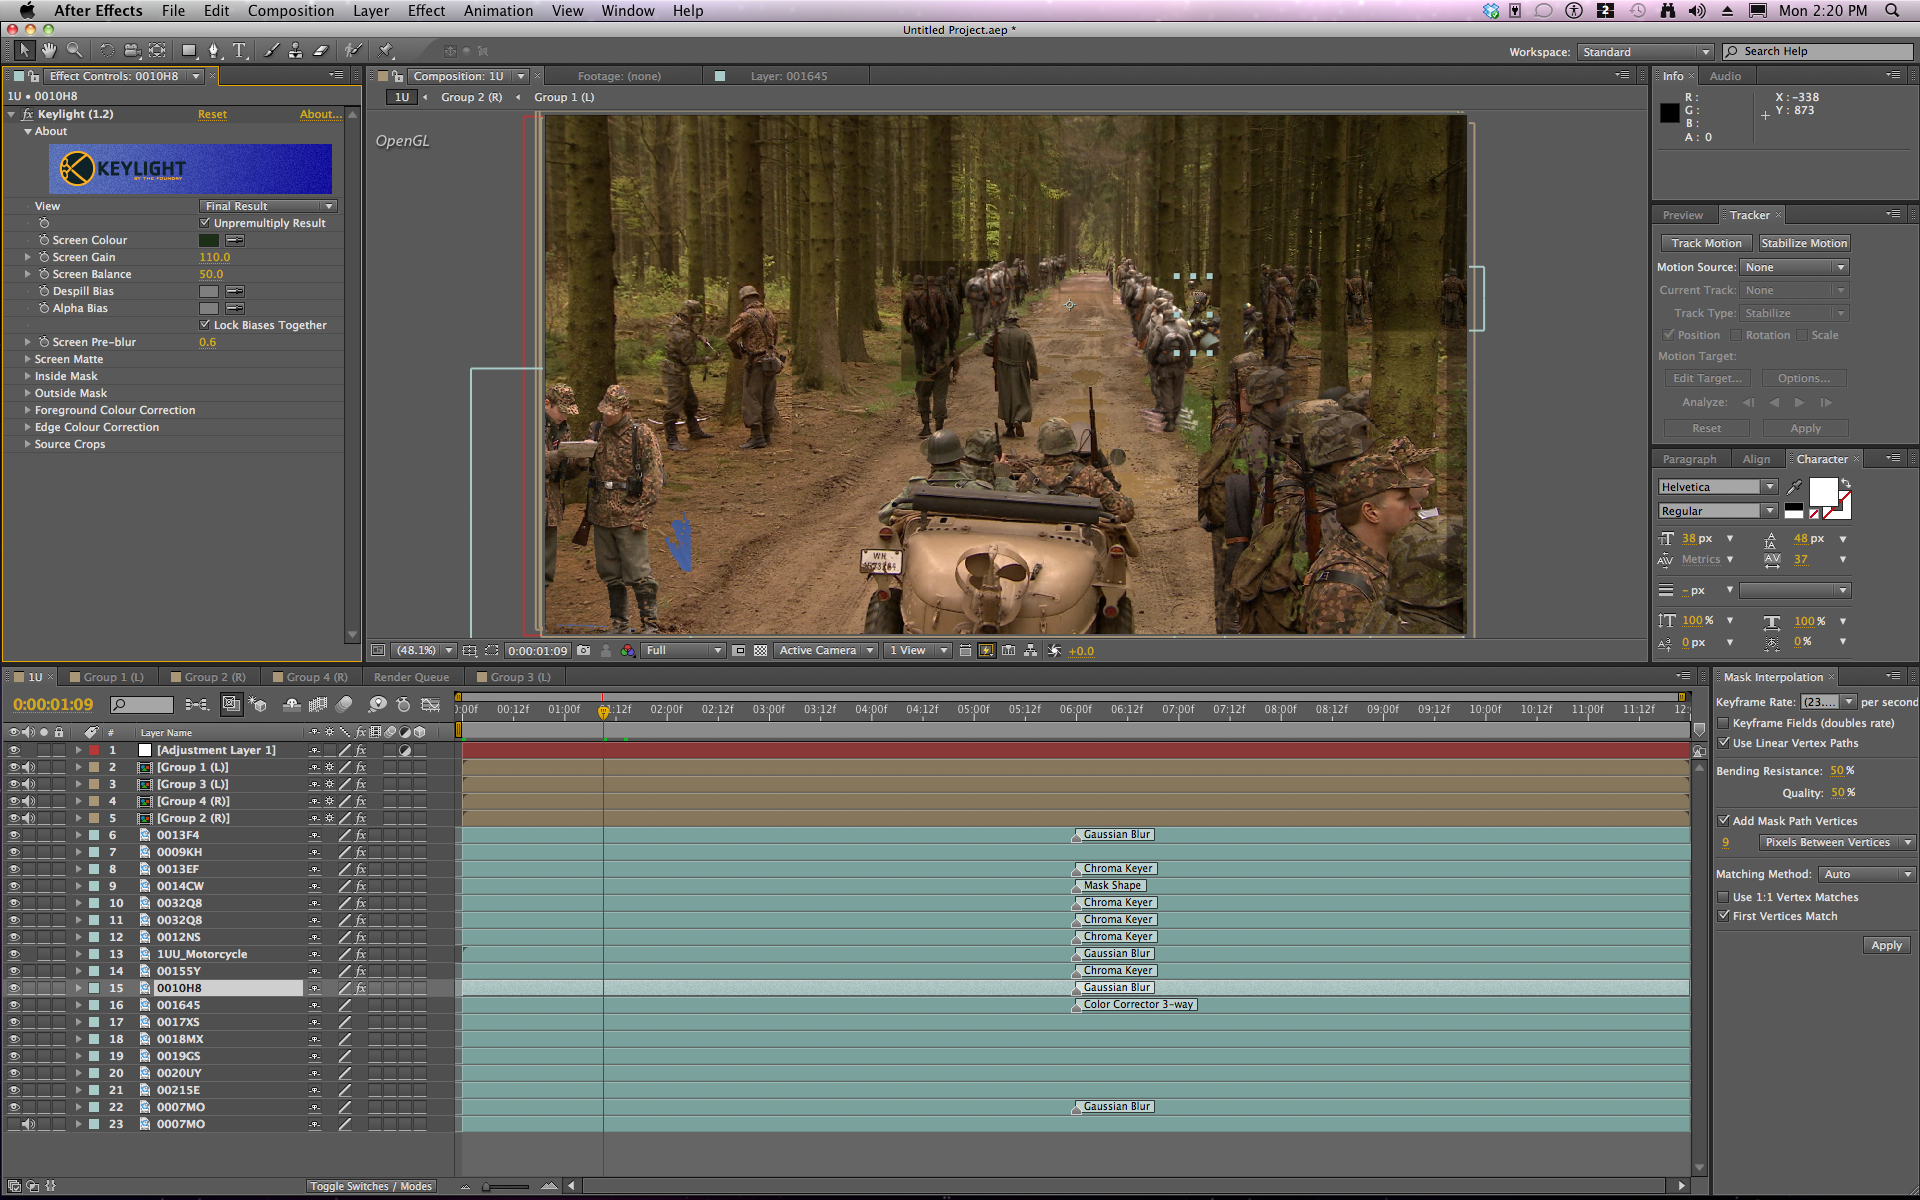

From top: screen shots showing Lumiere’s work in Final Cut Pro, After Effects, and the finished image as it aired. Click on any image to see full size.
So I tried a couple of shots. There is a big shot in the woods where hundreds of soldiers were marching down a road. He basically shot the same actors in different spots on that road with the blue screen. Assuming this is a 1920×1080 frame, the key might only be 500×300. That’s even more frightening. So I tested the key right away in Final Cut and it looked OK, but it wasn’t perfect. I threw it into After Effects and tested the key with Keylight, and I suddenly realized why Keylight won an Academy Award. I was amazed at how easily those keys were pulled and how beautiful they were.
For the next two and a half months, I spent time as an editor choosing the assets, cutting the action, and composing the shots by placing the soldiers in the 1920×1080 frame. I felt like I was back as a nine-year-old, playing with my little green GIs. It was amazing – like a flashback!
Watch a breakdown of the compositing techniques used in the program’s creation, above.
Did the fact that your subjects were soldiers help sell those effects?
Here’s the good news about working in a military context – it works for you. Uniforms all look very much alike, so you can use the same guy many times, as long as you cut him doing different things. If it’s the back of an SS soldier or Volksgrenadier walking away from the camera, I could use the same take and multiply it five or 10 times, off-setting his action slightly, and suddenly I have a row of 10 soldiers walking away from the camera. The other advantage is that they are very disciplined, especially the Germans. They walk in unison, so you can use the same guy and it’s totally believable. The American GIs were a little cooler when they were walking, but the Volksgrenadier had a disciplined approach to marching.

Mouseover still above to compare to Lumiere’s rough comp in Final Cut Pro
When you were composing these scenes, were you working in Final Cut Pro or in After Effects?
I would do the selects for the soldiers’ individual actions in Final Cut, which I found to be a lot easier [than creating composites in After Effects]. If I knew that a shot would have heavy machinery [created in CG], I would take a still from the Web, cut it out, and make a PNG of it so there would be a tank here, a Schwimmwagen there.
What if you needed to move between the two?
I would compose the shots in Final Cut and then, using Automatic Duck Pro Import AE, I would send the shot to After Effects. I would use a quick key in Final Cut to see what was going on, but then in After Effects I would ignore the key filter and just rely on Keylight. It’s so much easier, because if I knew that a key worked for a specific reel, I could copy and paste it through all the layers that had been shot in the same situation. After I spent all this time composing the shots, I might be left with 30, 40, or 50 layers of HD video [in each shot]. I started manipulating the layers, throwing the guys farther away from the camera out of focus, creating depth of field, and manipulating the colors a little.
When I felt that I had developed a decent approach, I would do final touch-ups and sometimes put notes on the screen for the compositing and VFX team [at C4 in Toronto], and then send them the file. They had an exact copy of my hard drive, and when they opened the After Effects file, they could see exactly what the intention was. They cleaned the key, put snow on the guys’ shoulders, winterized the scene – this was all shot in the summer – and added things like CGI tanks in the background. They would even touch up the guys I had duplicated, making their uniforms look slightly more individual.
What other kinds of effects did you work on?
Many of the artillery explosions were visual effects I did – tracking, smoke, and explosions – after the fact in After Effects. When we shot the 333rd Battery C position, they had a 105mm howitzer, not the much bigger 155mm. They weren’t going to use the cannon [in the final shots] but they wanted the legs. But those guns were from the air force, not the army, and when they shot the close-ups of the soldiers with the guns, you could read an AF serial number. I had to go in and remove those stencils from those guns in the shaky-cam footage. I used Mocha in After Effects to tracks and replace the texture of the gun. And I made all the green grass brown in every single shot.
What kind of background plates were you working with?
Sometimes we worked right off of 2D stills. I was getting better and better with After Effects – I took every tutorial from Video Copilot – and I started to have more confidence. We were missing some shots, so I started composing my own. One of those shots, of the Volksgrenadier attack position, is a long dolly shot from left to right that goes past a tree that’s right in front, and you see all the Germans running toward the camera, attacking the position. That was all done on an iStock photo of the Ardennes. I sliced pieces of the still image to create a 3D space, so that when the guys were running toward the camera I could choose their distance. When you start composing these things, they start to feel real because of the sense of depth. In the far background I had explosions, because the Americans were shelling positions way past these guys, because they didn’t know they were there. That was all done in After Effects. It’s a lot of fun – and a very different skill set.
Crafts: Editing VFX/Animation
Sections: Creativity Technology
Topics: Feature Project/Case study final cut pro
Did you enjoy this article? Sign up to receive the StudioDaily Fix eletter containing the latest stories, including news, videos, interviews, reviews and more.


Leave a Reply