Step 1
LAY IN YOUR MUSIC TRACK
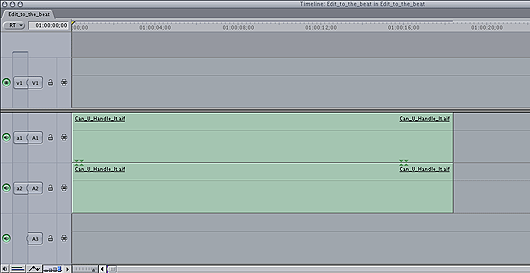
This tutorial is for those want to establish a visual rhythm for a highlight reel or basic music video. Import your music for the project into Final Cut Pro, and then edit it to the Timeline. In this example, I’m laying the music to tracks A1 and A2 because I won’t be using the audio in my video clips. If you’re going to use the audio from your video clips, or lay in voiceover, edit the music to tracks A3 and A4.
Editing to the beat works best with music that you’re familiar with, so after you lay in the music, listen to the track a few times so you can become acquainted with the upbeats and downbeats of the song. At this point, you should be visualizing how the action in your video flows with the beat of the song.

Step 2
LOCK THE MUSIC TRACK
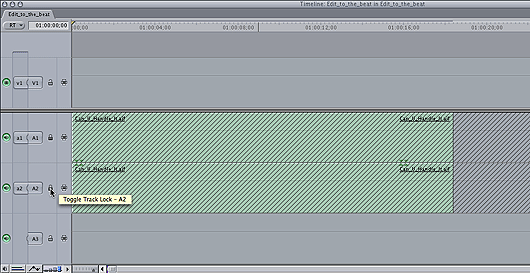
Click the track lock buttons to lock both music tracks. If you’ve placed your music tracks in tracks A1 and A2, and the video clips you are using have audio associated with them, locking the tracks ensures that you don’t blast away any of the music when you lay down slug – random filler from FCP’s Slug Generator – and video clips with audio.

Step 3
ADD SLUG TO THE SEQUENCE
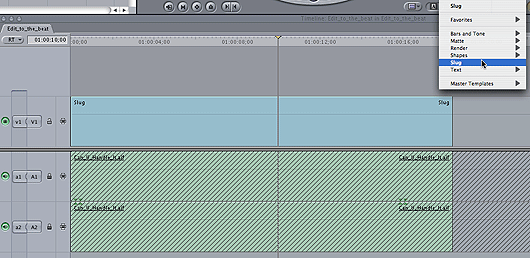
Click the Generator pop-up menu and choose slug. Make sure that the playhead is at the beginning of the sequence, and then edit the slug that has loaded into the Viewer window into video track 1. Drag the end of the slug until it is the same length as the music tracks.

Step 4
ADD EDITS TO THE SLUG
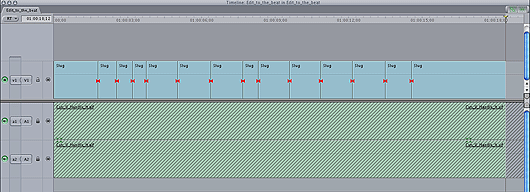
Place the playhead at the beginning of the sequence, then press the spacebar on the keyboard to begin playing the music in the sequence. While the music is playing, hold down the Control Key and tap the letter V on the keyboard to the beat, to add edits in real time. After you reach the end of the sequence, stop playback. The red markers that appeared as you were tapping turn into through edits in the slug. The edits in the slug act as placeholders for the actual clips you will use in the show. Don’t worry if your first attempt is a bit sloppy; you can tweak the edit points later using the trimming tools.

Step 5
REPLACE THE SLUG WITH VIDEO CLIPS
Double click a video clip in the Browser to load it into the Viewer, and then make an IN and OUT point in the clip that captures the action you want to edit to the project. Place the playhead directly in the middle of a clip and click the Replace Edit button or F11 on the keyboard. The video clip replaces the Slug Generator. Perform a Replace Edit for the remaining edits. If you know you want to use a certain video clip during a particular high point in the music, you can go ahead and plug it in. You can move to any point of the timeline and replace your slug along the way.

Step 6
TURN ON AUDIO WAVEFORMS
Press the Command + Option and W at the same time to toggle on the audio waveforms in the Timeline. Click the Track Lock buttons to unlock the music tracks and enlarge the Time so you can see the waveforms clearly. With the tracks enlarged you can clearly see the ebb and flow of the music. The peaks in the waveform provide you a visual reference for where cuts should line up.

Step 7
ADJUST THE EDIT POINTS
Click on the Roll tool in the tool palette or press R on the keyboard. The Roll tool is great for adjusting those not-so-perfect edit points, because it does not affect the overall duration of the sequence. With the Roll tool, you are simply making clips longer and shorter. Before you begin adjusting edit points, you need to turn off snapping by pressing N on the keyboard. Turning off snapping lets you move edit points in smaller increments, so you can be precise.
Use the waveform to line up edit points with the Roll tool and other trimming tools.
Step 8
FINE-TUNE THE ACTION
Click the Slip tool in the tool palette or press S on the keyboard. The Slip tool lets you frame the action inside the clip; it doesn’t affect the overall duration of the sequence. Click inside of a clip and drag left or right to reframe the action in the clip.

Tools Used: Apple Final Cut Pro 6
Your Guide

Lonzell Watson
Writer/Director/Producer
Lonzell is an Apple Certified Final Cut Pro Professional and Certified Avid Xpress Pro user. He is the author of Final Cut Pro 6 for Digital Video Editors Only, the Canon VIXIA High Definition Camcorder Digital Field Guide, and iPhoto ’09 Teach Yourself Visually, and is the Instructional Designer for iMovie ’09 Portable Genius, all from Wiley Publishing, Inc. He is has also created Final Cut Express 4 Essential Training tutorials for Lynda.com. His work includes national commercials and television programs for PBS, Fox Sports, the Outdoor Channel, and C-SPAN, and video editing for pop superstar Mariah Carey. Lonzell is a syndicated content writer with hundreds of published tutorials that relate to Apple’s Final Cut Studio product line.
Lonzell Says Keep in Mind…
In this tutorial I’ll show you how to use filler, or slug, as placeholder clips to establish a visual rhythm for a highlight reel or basic music video. If you are newer to video editing, you may notice that your projects often start strong and end weak. If you’ve used up all the good footage in the beginning, you won’t have any interesting shots left to use toward the end. Try using slug and the “Replace Edit” function to lay down a rough cut and establish a visual rhythm. It will provoke you to work non-sequentially and to spread your best shots throughout the sequence. And remember, you don’t have to come out of the gate laying down perfectly edited clips to end up with something great.
Lonzell Watson
lwatson@techinkonline.com
Did you enjoy this article? Sign up to receive the StudioDaily Fix eletter containing the latest stories, including news, videos, interviews, reviews and more.


Thanks Lonzell, you guys are the unsung heroes making everyone else rich!! I’m not in that bracket……yet! Everything I need to know is free to find on the Internet and all thanks to people like you. Long Live Lonzell!!